If you have a Nest thermostat at home, you can access it from your Google Sheet by using Google Apps Script to connect to the Smart Device Management API.
It means you can do some cool stuff like build a virtual, working Nest thermostat in your Google Sheet:
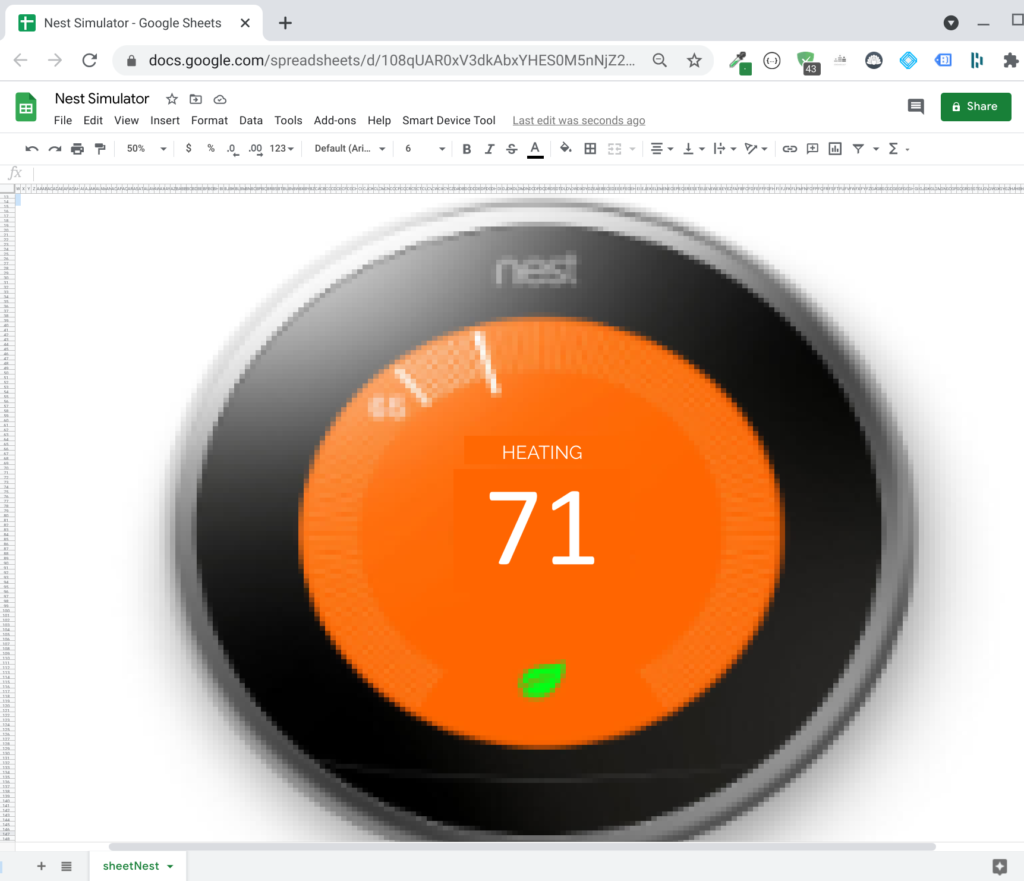
Zooming in, this is simply a pixel art image of a Nest device, in my Google Sheet:
(I’ll show you how to create this below.)
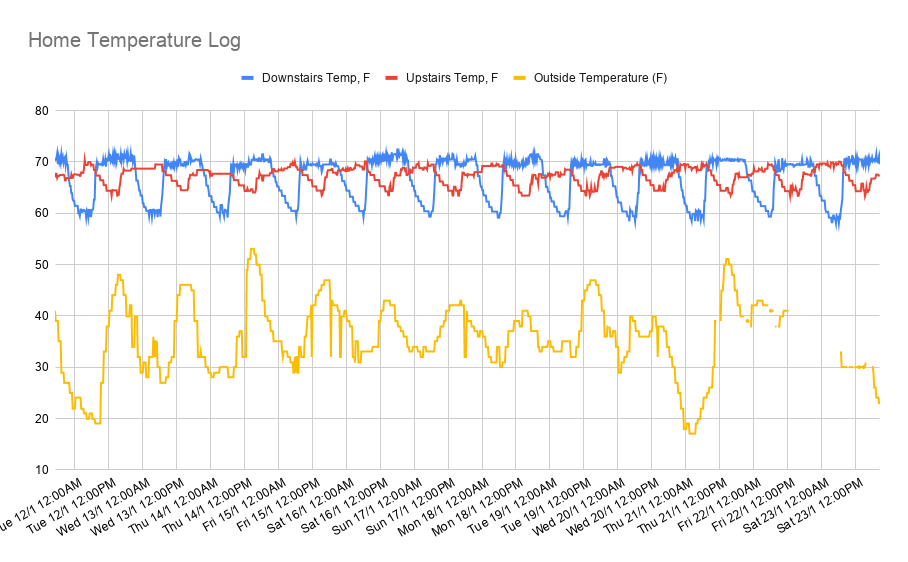
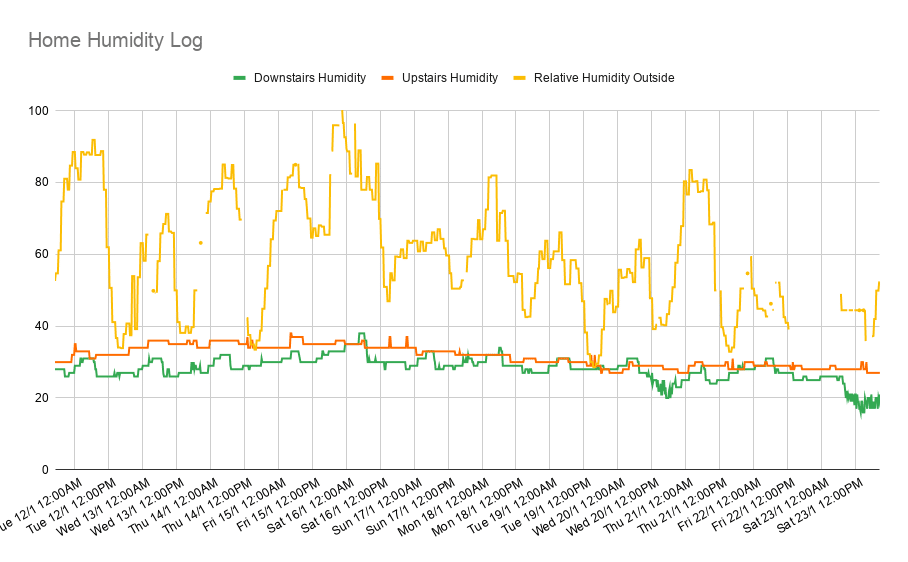
More practically, you can log the temperature (first chart) and humidity inside your home:
Smart Device Management API
In September 2020, Google launched the Device Access Console for Nest Devices. It meant individuals could connect to their smart home devices via the Smart Device Management API.
In this tutorial, we’ll look at how to connect to the Smart Device Management (SMD) API to access data from Nest Thermostats, using Apps Script.
If you’re new to Apps Script, have a read of my beginner’s guide to Google Apps Script.
API Setup
There are a number of steps you have to complete before you can access the SMD API.
Step 1: Register for the Device Access Program, which incurs a non-refundable $5 fee.
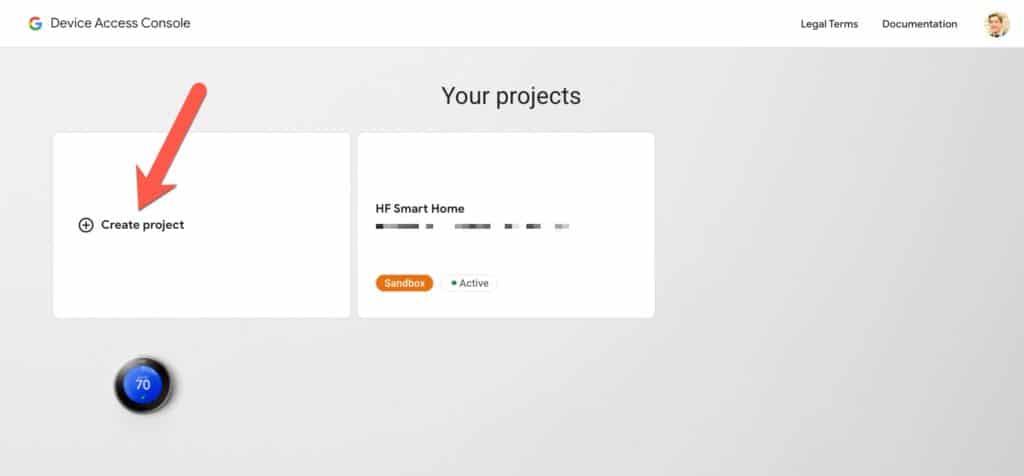
Step 2: In your Google Cloud Console, create a new project.
Step 3: Enable the Smart Device Management API in Google Cloud Console for this project.
Step 4: Create OAuth credentials for this project in your Google Cloud Console.
Step 5: Create a new Google Sheet (pro tip: type sheet.new into your browser!).
Step 6: Add a redirect URI for the project to your Google Cloud Project, which takes the form:
https://script.google.com/macros/d/{SCRIPT_ID}/usercallback
Replace {SCRIPT_ID} with your actual script ID, which can be found under the Settings menu on left hand side of the Apps Script Editor.
You want the ID of the script attached to the Google Sheet you created in step 5 for this project.
Step 7: Back in your Device Access Console, create a new project:
Step 8: When prompted, add the OAuth client ID from your Google Cloud project to this new Smart Device project.
Step 9: Activate your Nest device(s) when prompted during project creation
One important point is that you need to register for the API with the same Google account as the one you use for your Nest account.
Let’s start by creating creating the temperature logger:
Nest Thermostat Home Temperature and Humidity Logger
Apps Script & OAuth 2.0 Library
We need to use the OAuth2 for Apps Script library.
Step 10: Add the library from setup section here to your Apps Script project and select the most recent version.
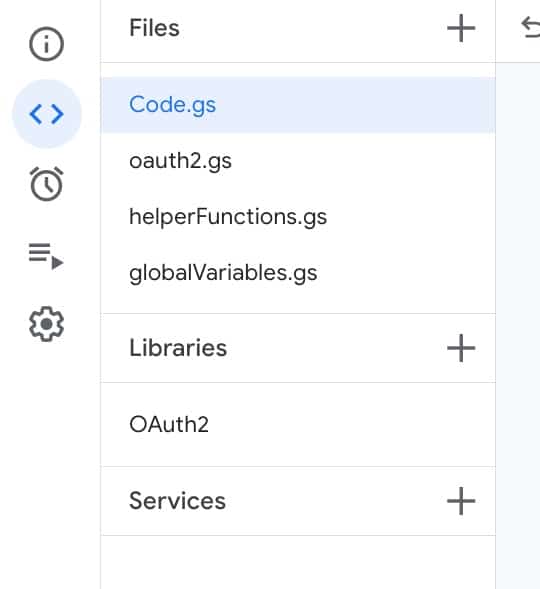
Step 11: Add 3 more script files to your project: oauth2.gs, helperFunctions.gs and globalVariables.gs
Step 12: Add Global Variables:
Open the script editor (Tools > Script editor) and paste the Google Cloud Client ID and Client Secret into your Apps Script file as global variables. (Warning: don’t share this script publicly without either removing them or using a more robust approach such as storing them in your user properties.)
/**
 * Global Variables
 */
const PROJECT_ID = 'XXXXXXXXXXXXXXX';
const OAUTH_CLIENT_ID = 'XXXXXXXXXXXXXXX';
const OAUTH_CLIENT_SECRET = 'XXXXXXXXXXXXXXX';
const DOWNSTAIRS_THERMOSTAT = 'XXXXXXXXXXXXXXX';
const UPSTAIRS_THERMOSTAT = 'XXXXXXXXXXXXXXX';
Code on GitHub: globalVariables.js
Step 13: Add the OAuth scaffolding to the OAuth.gs file.
This example follows the Drive App example in Google’s OAuth2 for Apps Script library, modified for the Smart Device Management API.
/**
 * Create the OAuth 2 service
 */
function getSmartService() {
  // Create a new service with the given name. The name will be used when
  // persisting the authorized token, so ensure it is unique within the
  // scope of the property store.
  return OAuth2.createService('smd')

      // Set the endpoint URLs, which are the same for all Google services.
      .setAuthorizationBaseUrl('https://nestservices.google.com/partnerconnections/' + PROJECT_ID + '/auth')
      .setTokenUrl('https://www.googleapis.com/oauth2/v4/token')

      // Set the client ID and secret, from the Google Developers Console.
      .setClientId(OAUTH_CLIENT_ID)
      .setClientSecret(OAUTH_CLIENT_SECRET)

      // Set the name of the callback function in the script referenced
      // above that should be invoked to complete the OAuth flow.
      .setCallbackFunction('authCallback')

      // Set the property store where authorized tokens should be persisted.
      .setPropertyStore(PropertiesService.getUserProperties())

      // Set the scopes to request (space-separated for Google services).
      .setScope('https://www.googleapis.com/auth/sdm.service')

      // Below are Google-specific OAuth2 parameters.

      // Sets the login hint, which will prevent the account chooser screen
      // from being shown to users logged in with multiple accounts.
      .setParam('login_hint', Session.getEffectiveUser().getEmail())

      // Requests offline access.
      .setParam('access_type', 'offline')

      // Consent prompt is required to ensure a refresh token is always
      // returned when requesting offline access.
      .setParam('prompt', 'consent');
}

/**
 * Direct the user to the authorization URL
 */
function showSidebar() {

  const smartService = getSmartService();

  if (!smartService.hasAccess()) {

    // App does not have access yet
    const authorizationUrl = smartService.getAuthorizationUrl();

    const template = HtmlService.createTemplate(
        '<a href="<?= authorizationUrl ?>" target="_blank">Authorize</a>. ' +
        'Reopen the sidebar when the authorization is complete.');

    template.authorizationUrl = authorizationUrl;

    const page = template.evaluate();

    SpreadsheetApp.getUi().showSidebar(page);

  } else {
    // App has access
    console.log('App has access');

    // make the API request
    makeRequest();
  }
}

/**
 * Handle the callback
 */
function authCallback(request) {

  const smartService = getSmartService();

  const isAuthorized = smartService.handleCallback(request);

  if (isAuthorized) {
    return HtmlService.createHtmlOutput('Success! You can close this tab.');
  } else {
    return HtmlService.createHtmlOutput('Denied. You can close this tab');
  }
}
Code on GitHub: Oauth2.js
Step 14: Add helper functions to the helperFunctions.gs file
A couple of useful functions to convert from celcius to farenheit and vice versa.
/**
 * function to convert celcius to farenheit
 */
const convertCtoF = t => ( (t * 9/5) + 32 );
const convertFtoC = t => ( (t - 32) * 5/9 );
Code on GitHub: helperFunctions.js
Step 15: Finally, add the actual program logic to call the endpoint and get the device IDs.
I run this function once to get a list of the device IDs, which I’ll use elsewhere in my code. The listDevices function in turn calls the makeRequest function to actually call the API.
/**
 * list devices to get thermostat IDs
 */
function listDevices() {

  // specify the endpoint
  const endpoint = '/enterprises/' + PROJECT_ID + '/devices';

  // blank array to hold device data
  let deviceArray = [];

  // make request to smart api
  const data = makeRequest(endpoint);
  const deviceData = data.devices;
  console.log(deviceData);

  deviceData.forEach(device => {
    const name = device.name;
    const type = device.type;
    deviceArray.push([name,type]);
  });

  // get the Sheet
  const ss = SpreadsheetApp.getActiveSpreadsheet();
  const sheet = ss.getActiveSheet();

  // output the data
  sheet.getRange(2,1,deviceArray.length,2).setValues(deviceArray);

}

/**
 * function to make request to google smart api
 */
function makeRequest(endpoint) {

  // get the smart service
  const smartService = getSmartService();

  // get the access token
  const access_token = smartService.getAccessToken();
  console.log(access_token);

  // setup the SMD API url
  const url = 'https://smartdevicemanagement.googleapis.com/v1';
  //const endpoint = '/enterprises/' + PROJECT_ID + '/devices';

  // setup the headers for the call
  const headers = {
    'Authorization': 'Bearer ' + access_token,
    'Content-Type': 'application/json'
  }

  // set up params
  const params = {
    'headers': headers,
    'method': 'get',
    'muteHttpExceptions': true
  }

  // try calling API
  try {
    const response = UrlFetchApp.fetch(url + endpoint, params);
    const responseBody = JSON.parse(response.getContentText());

    return responseBody;
  }
  catch(e) {
    console.log('Error: ' + e);
  }
}
Code on GitHub: Code.js
Step 16: Add the device IDs to your global variables file, replacing the “XXXXXXXX”.
I have two Nest thermostats, one upstairs and one downstairs, hence why I have those two global variables.
Step 17: Get the device traits, i.e. the temperature, humidity etc.
/**
 * function to make request to google smart api
 */
function logThermostatDataAllDevices() {

  // get the latest weather data
  const weatherDataArray = retrieveWeather('KMRB');
  console.log(weatherDataArray);

  // get the smart service
  const smartService = getSmartService();

  // get the access token
  const access_token = smartService.getAccessToken();

  // setup the SMD API url
  const url = 'https://smartdevicemanagement.googleapis.com/v1';
  const endpoint = '/enterprises/' + PROJECT_ID + '/devices';

  // setup the headers for the call
  const headers = {
    'Authorization': 'Bearer ' + access_token,
    'Content-Type': 'application/json'
  }

  // setup the parameters for url fetch
  const params = {
    'headers': headers,
    'method': 'get',
    'muteHttpExceptions': true
  }

  // empty array to hold device data
  let dataArray = [];
  //let smdWeatherArray = [];

  // try calling API
  try {

    // url fetch to call api
    const response = UrlFetchApp.fetch(url + endpoint, params);
    const responseCode = response.getResponseCode();
    const responseBody = JSON.parse(response.getContentText());

    // log responses
    console.log(responseCode);
    //console.log(responseBody);

    // get devices
    const devices = responseBody['devices'];
    //console.log(devices);

    // create timestamp for api call
    const d = new Date();

    devices.forEach(device => {

      if (device['type'] === 'sdm.devices.types.THERMOSTAT') {

        // get relevant info
        const name = device['name'];
        const type = device['type'];
        let location = '';
        const humidity = device['traits']['sdm.devices.traits.Humidity']['ambientHumidityPercent'];
        const connectivity = device['traits']['sdm.devices.traits.Connectivity']['status'];
        const fan = device['traits']['sdm.devices.traits.Fan']['timerMode'];
        const mode = device['traits']['sdm.devices.traits.ThermostatMode']['mode'];
        const thermostatEcoMode = device['traits']['sdm.devices.traits.ThermostatEco']['mode'];
        const thermostatEcoHeatCelcius = device['traits']['sdm.devices.traits.ThermostatEco']['heatCelsius'];
        const thermostatEcoHeatFarenheit = convertCtoF(thermostatEcoHeatCelcius);
        const thermostatEcoCoolCelcius = device['traits']['sdm.devices.traits.ThermostatEco']['coolCelsius'];
        const thermostatEcoCoolFarenheit = convertCtoF(thermostatEcoCoolCelcius);
        const thermostatHvac = device['traits']['sdm.devices.traits.ThermostatHvac']['status'];
        const tempCelcius = device['traits']['sdm.devices.traits.Temperature']['ambientTemperatureCelsius'];
        const tempFarenheit = convertCtoF(tempCelcius);

        if (name === 'enterprises/' + PROJECT_ID + '/devices/' + DOWNSTAIRS_THERMOSTAT) {
          location = 'Downstairs';
        }
        else {
          location = 'Upstairs';
        }

        dataArray.push(
          [
            d,
            name,
            type,
            location,
            humidity,
            connectivity,
            fan,
            mode,
            thermostatEcoMode,
            thermostatEcoHeatCelcius,
            thermostatEcoHeatFarenheit,
            thermostatEcoCoolCelcius,
            thermostatEcoCoolFarenheit,
            thermostatHvac,
            tempCelcius,
            tempFarenheit
          ].concat(weatherDataArray)
        );

        //dataArray = dataArray;

      }

    });
    console.log(dataArray);

    // get the Sheet
    const ss = SpreadsheetApp.getActiveSpreadsheet();
    const sheet = ss.getSheetByName('thermostatLogs');

    // output the data
    sheet.getRange(sheet.getLastRow()+1,1,dataArray.length,dataArray[0].length).setValues(dataArray);
  }
  catch(e) {
    console.log('Error: ' + e);
  }

}
You’ll notice that this function calls another function, on line 7, to retrieve a local weather forecast to add outside measurements into the mix.
Later the outside weather data array (returned from the weather function) is concatenated to the Nest Thermostat data array, on line 102, before the combined arrays are pasted as rows into the Google Sheet.
Each time the function runs, two rows are created: one for upstairs and one for downstairs.
Code on GitHub: Code.js
Now, let’s create the function to retrieve the outside conditions:
Adding Local Outside Temperature and Humidity
Step 18: Add a function to retrieve the current weather conditions from the nearest weather station to your location.
Use this station list to find out the code for your nearest station.
/**
 * function to retrieve latest weather forecast for nearby area
 * list of stations:
 * https://forecast.weather.gov/stations.php
 */
function retrieveWeather(stationCode) {

  const weatherArray = [];

  //const stationCode = 'KMRB';
  try {
    const weatherUrl = 'https://api.weather.gov/stations/' + stationCode + '/observations/latest';
    const response = UrlFetchApp.fetch(weatherUrl);
    const weatherData = JSON.parse(response.getContentText());

    // parse the data
    console.log(weatherData.properties);
    const textDescription = weatherData['properties']['textDescription'];
    const tempC = weatherData['properties']['temperature']['value'];
    const tempF = convertCtoF(tempC);
    const dewpointC = weatherData['properties']['dewpoint']['value'];
    const dewpointF = convertCtoF(dewpointC);
    const windDirection = weatherData['properties']['windDirection']['value'];
    const windSpeed = weatherData['properties']['windSpeed']['value'];
    const barometricPressure = weatherData['properties']['barometricPressure']['value'];
    const seaLevelPressure = weatherData['properties']['seaLevelPressure']['value'];
    const visibility = weatherData['properties']['visibility']['value'];
    const relativeHumidity = weatherData['properties']['relativeHumidity']['value'];
    const windChill = weatherData['properties']['windChill']['value'];

    // add to array
    weatherArray.push(
      textDescription,
      tempC,
      tempF,
      dewpointC,
      dewpointF,
      windDirection,
      windSpeed,
      barometricPressure,
      seaLevelPressure,
      visibility,
      relativeHumidity,
      windChill
    );
  }
  catch (e) {
    console.log('Error: ' + e);
  }
  console.log(weatherArray);

  return weatherArray;

}
The full script for the thermostat temperature and humidity logger, including the outdoor temperature and humidity, can be found here on GitHub: Thermostat Logger Repo
Step 19: Add a simple trigger to run the logThermostatDataAllDevices function on a periodic basis. You could consider once a day, once an hour or even more frequently. I’ve gone for once every 15 minutes.
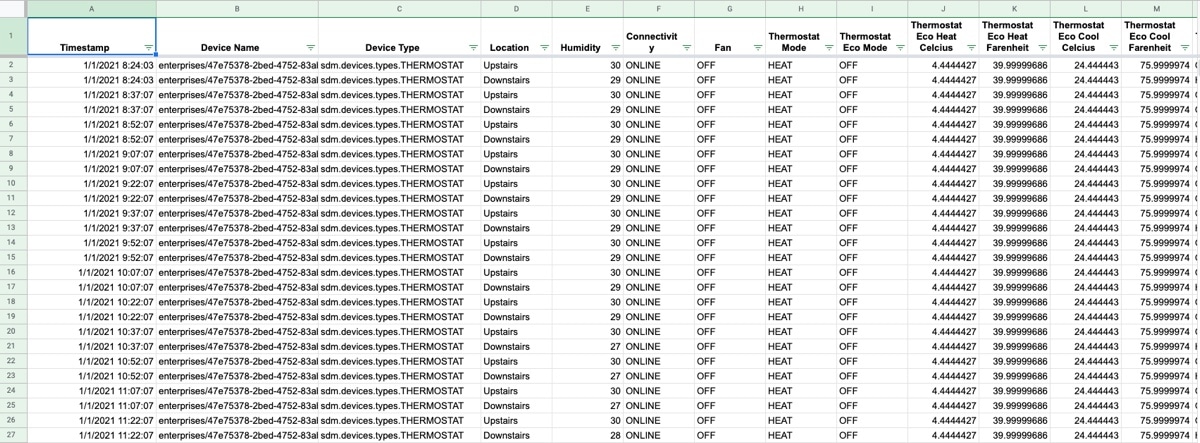
After a while, your data should look like this:
Creating a Chart to show the logs
We need to wrangle the data (shown above) from the Thermostats Logs table into something suitable for the Google Sheets chart tool.
Step 20: Create a new sheet in your Google Sheet
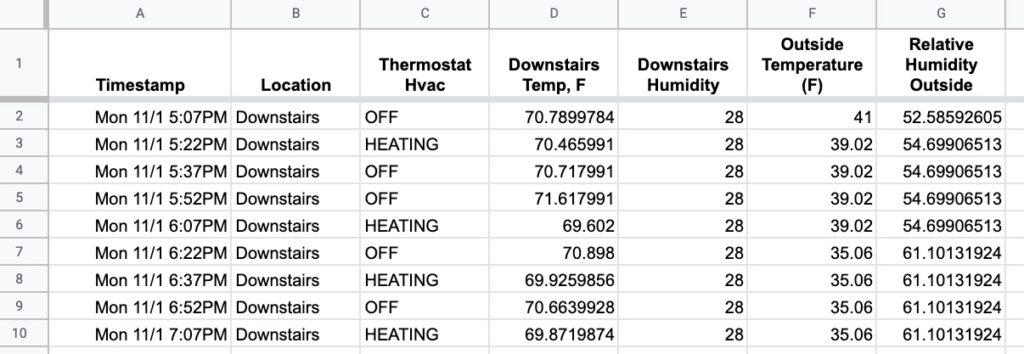
Step 21: In this new sheet, use the Google Sheets Query function in cell A1 to parse the thermostat logs data:
=QUERY(thermostatLogs!$A:$AB,"select A, D, N, P, E, S, AA where D = 'Downstairs' label P 'Downstairs Temp, F', E 'Downstairs Humidity'",1)It looks complicated but it really does two simple tasks:
- It filters the data to only include rows related to my downstairs thermostat
- It includes only the columns I need to create the chart
The output of this function looks like this:
Step 22: Adjacent to this output, use another Query function to output the upstairs temperature.
Step 23: plot a line chart using column A (Timestamp) as the chart X-axis and the downstairs temperature, upstairs temperature and outside temperature as series.
Step 24: Create the humidity chart in the same way.
Controlling Your Nest Thermostat from a Google Sheet
Set thermostat temperature API endpoint
Step 25: Create a new sheet in your Google Sheet, called “sheetNest”
Step 26: Add the set temperature function to your Code.gs file, which makes use of the ThermostatTemperatureSetpoint endpoint.
When you run this function, it takes the number from cell A1 (your input cell) and sends that to the SMD API as the temperature value to set the Nest to.
/**
 * function to change temperature to value in the Google Sheet
 */
function setTemperature() {

  // get temperature from Sheet
  const ss = SpreadsheetApp.getActiveSpreadsheet();
  const tempSheet = ss.getSheetByName('sheetNest');
  const tempF = tempSheet.getRange('A1').getValue(); // Change this cell reference to match the temperature input cell of your Google Sheet
  const tempC = convertFtoC(tempF);

  console.log(tempC.toFixed(1));
  console.log(typeof tempC)

  // get the smart service
  const smartService = getSmartService();

  // get the access token
  const access_token = smartService.getAccessToken();
  console.log(access_token);

  // setup the SMD API url
  const url = 'https://smartdevicemanagement.googleapis.com/v1';

  // set the endpoint
  const endpoint = '/enterprises/'  + PROJECT_ID + '/devices/' + DOWNSTAIRS_THERMOSTAT + ':executeCommand';

  // setup the headers for the call
  const headers = {
    'Authorization': 'Bearer ' + access_token,
    'Content-Type': 'application/json'
  }

  const data = {
    'command': 'sdm.devices.commands.ThermostatTemperatureSetpoint.SetHeat',
    'params': {
      'heatCelsius': tempC
    }
  }

  const options = {
    'headers': headers,
    'method': 'post',
    'payload': JSON.stringify(data)
  }

  try {
    // try calling API
    const response = UrlFetchApp.fetch(url + endpoint, options);

  }
  catch(e) {
    console.log('Error: ' + e);
  }
}
Code on GitHub: Code.js
Make your Google Sheet Virtual Nest Thermostat pretty!
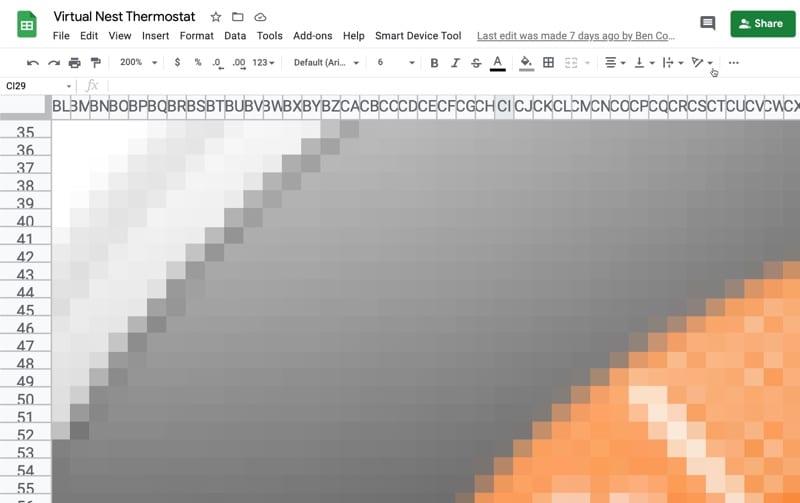
Step 27: To finish the virtual Nest thermostat, I used the Pixel Paintings with Google Sheets tool from fellow GDE Amit Agarwal to turn a picture of my Nest into a pixel image in my Google Sheet.
I uploaded a photo of my Nest thermostat and the Pixel Paintings tool turned it into this:
If you change the input cell to the middle of your Nest image (as I’ve done above where the big “71” is now the value I set my temperature to) don’t forget to also change the cell reference in your code file to get the temperature from the new input cell (“DA71” in my example). I.e. replace the “A1” on line 9 of the code above with “DA71” (or whatever cell you’re using to input your temperature).
Step 28: Finally, if you haven’t already, add a custom menu so you can run these functions directly from your Google Sheet:
/**
 * Custom menu to use tool from Sheet UI
 */
function onOpen() {

  const ui = SpreadsheetApp.getUi();

  ui.createMenu('Smart Device Tool')
    .addItem('Smart Device Tool', 'showSidebar')
    .addSeparator()
    .addItem('Log thermostat data','logThermostatDataAllDevices')
    .addItem('Set temperature','setTemperature')
    .addToUi();

}
Have fun!
Let me know in the comments if you build anything cool with this API.
Very cool, love the thermostat illustration!
Thanks for the original inspiration, Drew!
Thank you!!! Sadly, I’m getting an error “Access not granted or expired”. When I hard code my access token in as a global variable, it works fine, but then it expires after the hour or so. There’s something happening where it can’t retreive it on its own. Anyone seeing similar?
Found resolution. I bypassed the OAuth library with:
var token = ScriptApp.getOAuthToken();
and then added oauthScopes to my appsscript.json:
“oauthScopes”: [
“https://www.googleapis.com/auth/script.external_request”,
“https://www.googleapis.com/auth/userinfo.email”,
“https://www.googleapis.com/auth/sdm.service”,
“https://www.googleapis.com/auth/spreadsheets”
]
Now the magic really begins. Thanks Ben
Hey Jared,
My token times out as well, but after 7 days, so I’d love to find a solution that doesn’t require me to add a token refresh task.
When I use this token, I can’t find my Nest project, even though it works with the Ben’s auth flow. Any ideas?
Thanks!
I read that you need to go to your OAuth Consent Screen in Google Cloud Platform and set your publishing status from “Testing” to “In Production”. Hope that works for you.
Hi Jared,
What precisely did you do to achieve this? (i.e. Which lines of code did you replace with what? (Sorry I’m quite new to all of this))
I’ve figured out how to add the oauthScopes to the appsscript.json, but am unsure on what changes need to be made to Code.gs or oauth2.gs (?) in order for the code to work?
Did you figure this out? I am needing this fix as well.
I used the full script from the git library at the end of step 18. This adds a ‘menu’ option in the Google sheet named “Smart Device Tool”. When you click on the option “Smart Device Tool” it brings up a browser tab to ‘authorize’ the app, here you can authenticate with the account to access the nest thermostats, and you can select which thermostats can be accessed this way. After this successfully completed, I didn’t get the ‘access token’ errors. I made additional modifications to the script to get data from multiple weather stations for the units I wanted to monitor in more than one state.
Hello Christian,
Thank you for pointing this option out. I tried to click on the authorize button and it opens a new tab but it just says “Something went wrong”.
I also shortened the link to:
https://nestservices.google.com/partnerconnections
and it said “No partner connections found”.
Thanks Jared!
Just a question, do you know where this changes have to happen?
Thanks!
Hi Jared,
I have everything working except my access expires after an hour. I see you solved this issue and posted code but I’m not sure where to put those lines of code in the scripts. Can you please let me know where to paste them?
Thanks!
Let function does not work due to ES6 not in google scripts
ES6 syntax can be used with Google Apps Script. It was added in early 2020 with the v8 runtime upgrade. See here: https://www.benlcollins.com/apps-script/apps-script-v8-runtime/
Thanks Ben! Making progress now.
Are you familiar with issues in retrieving the access token? Error now is occurring on :
// get the access token
const access_token = smartService.getAccessToken();
Error: Property store is required.
Thanks for sharing! I’m happily plotting data with a few changes:
– I get the oauth token from accounts.google.com rather than nestservices.google.com
– I added async data collection
– I’m averaging weather data from two local stations
fork @ https://github.com/rjwalters/nestThermostatLogger
Great work, Robb! Thanks for sharing.
Do you run the logRedirectUri() function manually every time the token expires?
The Oauth2 token for SDM expires every hour.
I tried your branch Robb, but the getstation raises the below error, seems its not defining the weather code, even though its in globalvariables. Any idea?
Error: Exception: Request failed for https://api.weather.gov returned code 404. Truncated server response: {
“correlationId”: “275e7f67”,
“title”: “Not Found”,
“type”: “https://api.weather.gov/problems/NotFound”,
“status”: 404,
“detai… (use muteHttpExceptions option to examine full response)
In your modified script which trigger have to run because I don’t see the logThermostatDataAllDevices function, thanks.
Very cool project. This came with some challenges that helped me with my App Script debugging. Keep them coming Ben!!
Hi,
When I click “Authorize” from the google sheet menu, I get the Google Nest permissions page. I select all the items, click next and get following error:
Authorization Error
Error 400: invalid_request
OAuth 2 parameters can only have a single value: login_hint
Any suggestions on what could be wrong? Thanks.
I was able to solve it. A web search did not help, but I looked through oauth2.gs and the comment for ‘login_hint’ explained the possible issue with multiple google accounts, which I have. I used a different browser with only one google account and the authorization worked fine.
Next issue: In sheets the script says it executed, but nothing gets logged. When I execute in the Apps Script editor, the data gets read from the thermostats, but I get: “Error: TypeError: Cannot read property ‘getRange’ of null.” with the last value of the array being NULL.
Rename the spreadsheet to: “thermostatLogs”, this is not mentioned in the tutorial.
Thank you Milton! That worked. I had named the file to “thermostatLogs”, but it’s actually the Sheet (bottom of the page) that has to be named that way. It’s obvious now looking through the code. Thank you very much!
I set all this up, to the best of my ability, but when I run in I get:
Authorisation Error
Error 400: invalid_request
OAuth 2 parameters can only have a single value: login_hint
I get the Google authorise screen and allow “Allow **** to see information about your home”, and “Allow **** to access and control your thermostat”, that I guess are required?
I had to comment out the following line:
https://github.com/benlcollins/nestThermostatLogger/commit/f0d7508c31499500cde44cc4bdaa26138f3f9e04#r78132354
Thanks to Robb’s comment, I was able to get the OAuth stuff working.
After that, I modified the “logThermostatDataAllDevices” function so that each time it runs, it puts only the time stamp and the temperature reading from each of my thermostats all on 1 line. That’s the only info I’m really interested in. Allows me to chart the temperature in a very straight-forward manner. Here it is:
function logThermostatDataAllDevices() {
// get the smart service
const smartService = getSmartService();
// get the access token
const access_token = smartService.getAccessToken();
// setup the SMD API url
const url = ‘https://smartdevicemanagement.googleapis.com/v1’;
const endpoint = ‘/enterprises/’ + PROJECT_ID + ‘/devices’;
// setup the headers for the call
const headers = {
‘Authorization’: ‘Bearer ‘ + access_token,
‘Content-Type’: ‘application/json’
}
// setup the parameters for url fetch
const params = {
‘headers’: headers,
‘method’: ‘get’,
‘muteHttpExceptions’: true
}
// empty array to hold device data
let headerArray = [];
let dataArray = [];
// try calling API
try {
// url fetch to call api
const response = UrlFetchApp.fetch(url + endpoint, params);
const responseCode = response.getResponseCode();
const responseBody = JSON.parse(response.getContentText());
// log responses
console.log(responseCode);
//console.log(responseBody);
// get devices
const devices = responseBody[‘devices’];
//console.log(devices);
// create timestamp for api call
const d = new Date();
headerArray.push(“DateTime”);
dataArray.push(d);
devices.forEach(device => {
if (device[‘type’] === ‘sdm.devices.types.THERMOSTAT’) {
// get relevant info
const customName = device[‘traits’][‘sdm.devices.traits.Info’][‘customName’];
const tempCelcius = device[‘traits’][‘sdm.devices.traits.Temperature’][‘ambientTemperatureCelsius’];
const tempFarenheit = convertCtoF(tempCelcius);
headerArray.push(customName);
dataArray.push(tempFarenheit);
}
});
// get the latest weather data
headerArray.push(“Outside”);
dataArray=dataArray.concat(retrieveWeather(‘KBTV’)); // Temperature at BTV airport
console.log(headerArray);
console.log(dataArray);
// get the Sheet
const ss = SpreadsheetApp.getActiveSpreadsheet();
const sheet = ss.getSheetByName(‘thermostatLogs’);
// output the data
if(sheet.getLastRow()===0){
sheet.getRange(1,1,1,headerArray.length).setValues([headerArray]);
}
sheet.getRange(sheet.getLastRow()+1,1,1,dataArray.length).setValues([dataArray]);
}
catch(e) {
console.log(‘Error: ‘ + e);
}
}
this script work only for US user or is possible to EU user because the wheather site is only for US member. How to change the wheather data source?
Thanks
I used api.openweathermap.org (works globally?)
you need to replace the id=2792165 with your local one.
function retrieveWeather(stationCode) {
const weatherArray = [];
//const stationCode = ‘KMRB’;
try {
var wxrequest=UrlFetchApp.fetch(‘http://api.openweathermap.org/data/2.5/weather?id=2792165&appid=6a4db183ab23e5289f350f4948cf62ee’);
var wxresult=JSON.parse(wxrequest.getContentText());
var outside_temp = wxresult[“main”][“temp”] – 273;
var outside_humidity = (wxresult[“main”][“humidity”]);
var weather = (wxresult[“weather”][0][“main”]);
// add to array
weatherArray.push(
weather,
outside_temp,
outside_humidity
);
}
catch (e) {
console.log(‘Error: ‘ + e);
}
console.log(weatherArray);
return weatherArray;
}
Thanks for sharing that crucial info, Frank! Cheers!
Very good job
I am looking for a android APK which Can Do this job .
The nest view results are very poors.
Hello,
great work ! i try to complete the parameters.
Just a question, i own 3 Nest thermostat in my home.
which code should I enter as “XXXXXXXX” in Global Variables to identify each thermostats?
Serial?
Mac address?
Other?
Thanks,
Luca
If I have two or more NEST thermostats in my house, do I have to create one project in the Devide Access Console and one in the Google Cloud Console for each thermostat?
*Device Access Console
Thanks so much for this! I can’t seem to get any data to populate in the spreadsheet, it’s completely blank.
What do I enter in the cell to trigger the command to populate the spreadsheet? Thanks so much for your help!
Are others finding that their scripts need reauthentication after 14-days? I got this report of failures for 289 failures of the logThermostatDataAllDevices function, which I’m running every 5 minutes:
Error: Access not granted or expired.
I could not find any way to extend the OAuth token session length.
Thanks!
I’m having the exact same issue, tried searching on stackoverflow to no avail. Appears that this happened due to not running rhinoV8 but I’m on the latest version. Glad to know I’m not alone with this though.
have you guys managed to figure this out ? I’m also having this problem. It works for a week or so, then stops working till I re-authorize it.
This is a great tutorial, the only thing I’m having trouble with is what to name the column headers in the spreadsheet and the sheet names. Is it possible to upload a spreadsheet to use as an example? I haven’t gotten it to completely work yet because I’m still working those things out.
Hey all – I accidentally put my Nest Thermostat (the cheap non-learning one) into Eco Hold mode: meaning it kept the same temp indefinitely (https://support.google.com/googlenest/answer/10120172?hl=en)
This updates the thermostatEco.mode endpoint to: “MANUAL_ECO”, but I can’t find a the temperature setting when it’s in Manual mode, Both of the ThermostatTemperatureSetpoint values (for coolCelsius and heatCelsius) are showing NaN.
I guess this is documented here (https://developers.google.com/nest/device-access/traits/device/thermostat-eco#setmode), but it’s kind of annoying. Does anybody know of a workaround?
“If Eco mode is MANUAL_ECO:
* Commands for the ThermostatTemperatureSetpoint trait are rejected.
* Temperature setpoints are not returned by the ThermostatTemperatureSetpoint trait.”
Hi, this looks like a great capability, but before I convert my Nest.com account to a Google Nest account – I would like to know if the Authentication expiry issue is resolved? There is not a lot of point to this if the auth token keeps expiring after 7 or 14 days and needs a manual intervention.
where do you find the oauth credentials
Is it possible to acquire the “Thermostat Cycle Time” data for analysis in Excel… if so where would one learn how to do this ? One use for this data analysis would be to determine if the heating system (Central Heat Pump in this case) is experiencing any Short Cycling episodes. For example “Heat Pump On-Time” and “Heat Pump Off-Time” showing with very low time durations ( less that 30min ON or Less than 20Min OFF) may indicate the HP is Short Cycling. Short Cycling generates excessive ware on the HP and is inefficient. Low Refrigerant level, air filter issues , electrical issues, etc. can be the cause of Short Cycling.
Thanks
For those trying this out in 2024… the auth scheme here no longer works as far as I could tell. By switching to Robb’s fork in the comment above I was able to get auth but it expired after one hour. Finally, I changed the following line in his oauth2.js file from…
.setParam(‘approval_prompt’, ‘force’)
to instead be
.setParam(‘prompt’, ‘consent’)
After making this change I was able to run the logRedirectUri() function and get an Authorization window to pop up, followed the prompts, and it appears to be working…
Now to wait and see if it expires after 7 days as some others have mentioned.
As an aside, one major annoyance, is the Google API does not allow access to the data from the Nest Temperature Sensor I have connected to my system!