In December 2020, Google launched a new Google Apps Script Integrated Development Environment or IDE for short.
The Apps Script team knocked it out of the park with this new editor.
If you’re new to Apps Script, check out my beginner guide to Google Apps Script first.
Video Walkthrough Of The New Google Apps Script IDE
In this video, I’ll show you some of my favorite features of the new Google Apps Script IDE, and below the video is a comprehensive reference guide.
Guide To The Google Apps Script IDE
The new editor is built on top of the VS Code Monaco editor.
It’s a huge leap forward over the old one.
A lot of these features are new to me, so it was super interesting to put this guide together and discover all sorts of hidden tricks!
Shortcuts are listed in parentheses alongside each feature, with the PC/Chromebook shortcut listed first, followed by the Mac shortcut.
 💡 Learn more
Learn more about Google Apps Script in this free, beginner Introduction To Google Apps Script course
General
1. Clean looks
The new interface is much cleaner and sleeker than the old one. It features a modernized UI, taking inspiration from Google’s material design concepts.
It’s much more intuitive and enjoyable to work with. Key features like Triggers, Logs, Libraries and Services are not buried deep in the menus.
2. Manage Everything In One Place
The new IDE flows. Everything is right there at your fingertips.
Projects can be created, maintained and deployed from one window.
Project details, triggers and executions are now available within the project, saving you the time and hassle of going to the global Apps Script dashboard.
3. Intuitive Interface
The new Google Apps Script IDE is more intuitive than its predecessor.
Key features are much more accessible in the new editor. They’re given more prominence so it’s easier to access them.
For example, libraries or services are listed alongside the files, which is a huge improvement over the old editor when they were buried deep in the menus.
Visual Features
4. Visual cues
The new editor is a much richer experience. There’s an abundance of visual cues to help you “see” your code better.
For example, the IDE adds tab lines that show you the indentation depth of your code blocks:
This really helps you stay sane when you have complex, nested blocks.
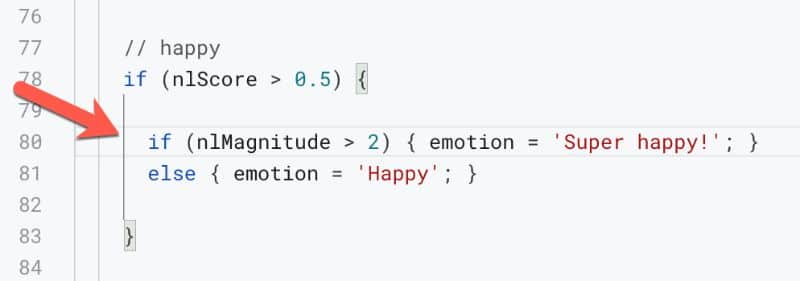
Another example are the highlights applied to all occurrences of an element, e.g. a variable, when you click on one of them:
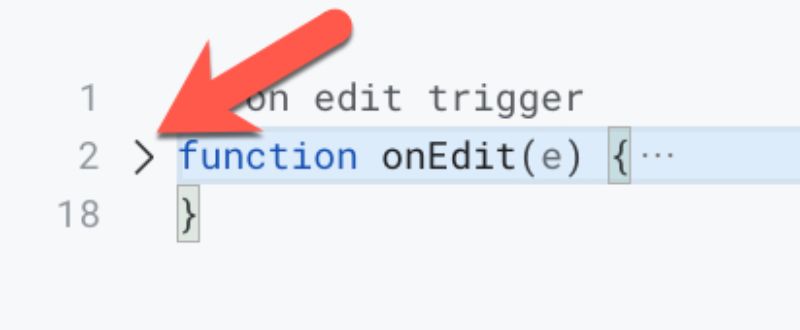
5. Hide code blocks
In the new editor you can hide code blocks to make it easier to manage your code.
You’ll see triangle shaped toggle switches between the line numbers and the code to hide (or show) your code blocks. You can also toggle the hide or show code options using the command palette (see #65 Fold and #132 Unfold).
Finished editing that function? Hide it and make your life easier!
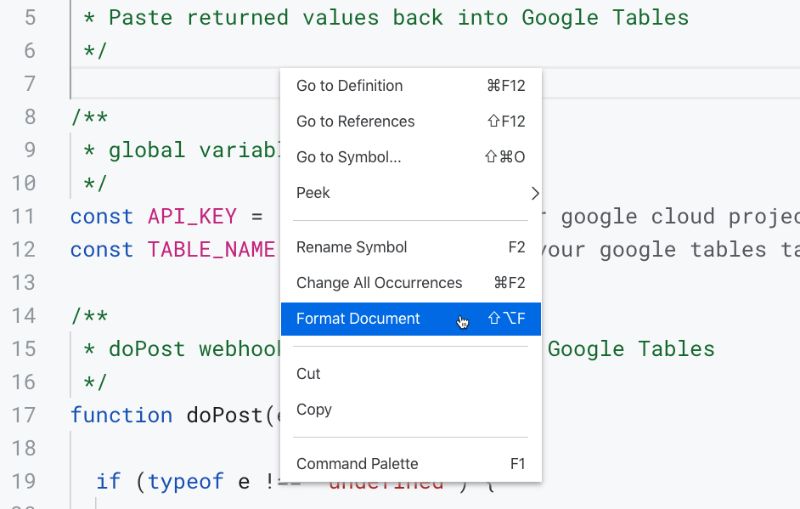
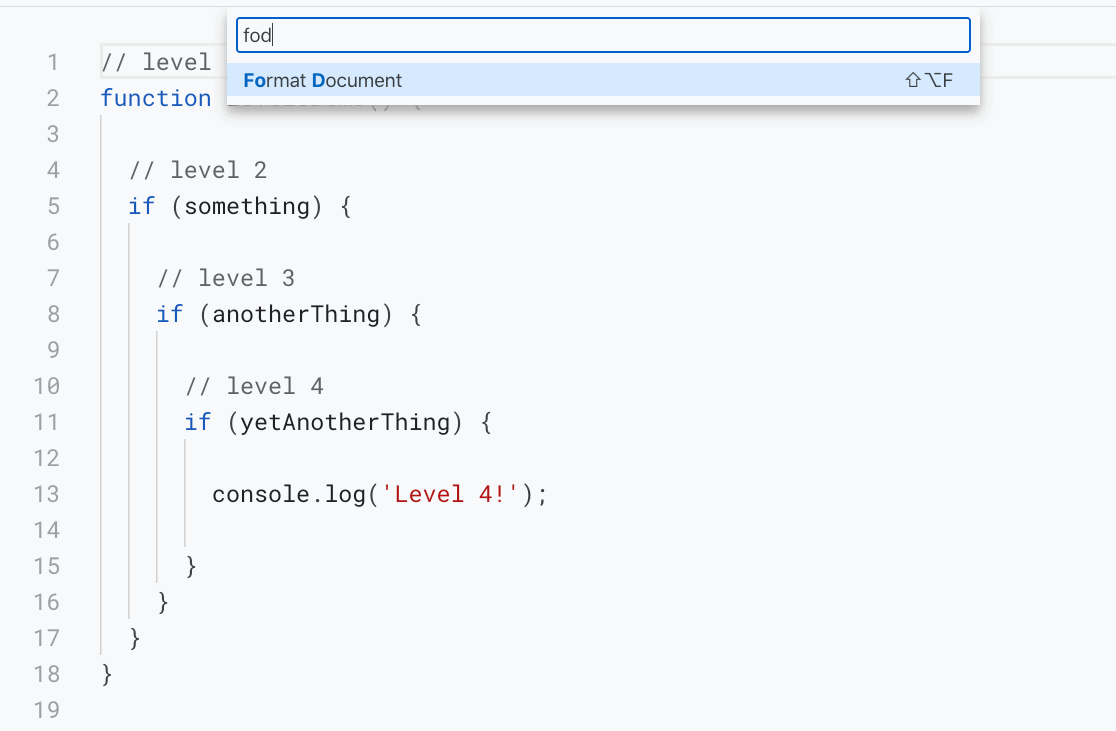
6. Auto format
Keeping your code properly indented makes it much easier to read and understand.
The new Format Document feature will do that for you. It’s especially useful if you’ve copied code from somewhere else where the indenting is a mess.
Right click and select Format Document to automatically format your code and ensure it’s correctly indented.
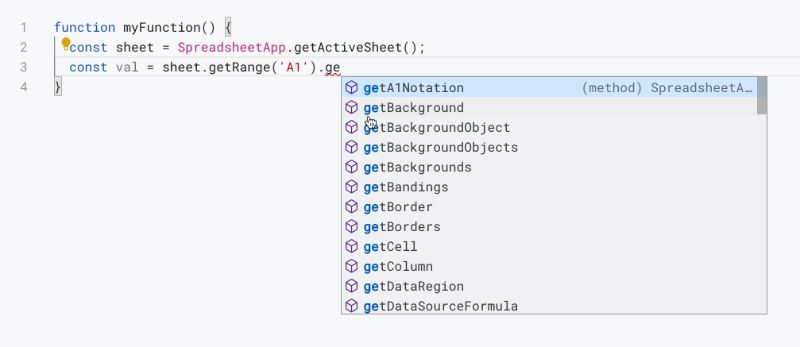
7. Rich auto-complete
The auto-complete is much more substantial in this new editor.
It not only surfaces information about the built-in functions and methods, but it will suggest auto-complete for items you’ve added. That variable with the complex name you defined a 100 lines further up your code, well, it now shows in the auto-complete. Woohoo! This makes life easier.
Also, the IDE automatically adds the second parenthesis or second quote mark, which helps you avoid omission errors.
You can toggle the auto-complete with Ctrl + Space (or Ctrl + Alt + Space on Chromebook).
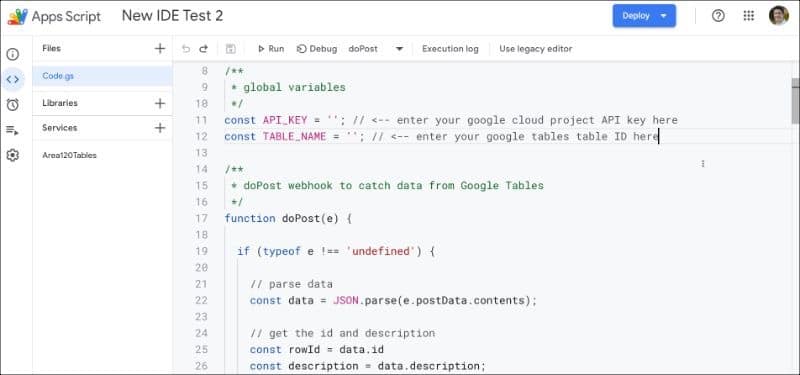
Main Menu (Pop Out Left Sidebar)
The main menu is hidden out of site on the left of the file navigation pane. It pops out when you hover over it.
It gives you access to the 5 top-level project controls:
It means you can not only create script projects within this new IDE, but you can also manage them.
8. Overview
The Overview window shows high-level project details, including deployments, execution and error statistics, OAuth scopes and how many users the project has.
9. Editor
This takes you to the code Editor window, where you write your Apps Script code.
10. Triggers
All your project triggers are easily accessed in this window, without having to leave the project.
This is a big improvement to have the project triggers easily accessed from the top-level menu. In the old editor triggers were buried at the bottom of a menu, or accessed through the global Apps Script dashboard.
11. Executions
Takes you to a window of all your script executions.
It’s a big improvement to see your execution logs from inside of the project.
12. Project Settings
Access all your project settings, including Script IDs & Keys and Google Cloud project details.
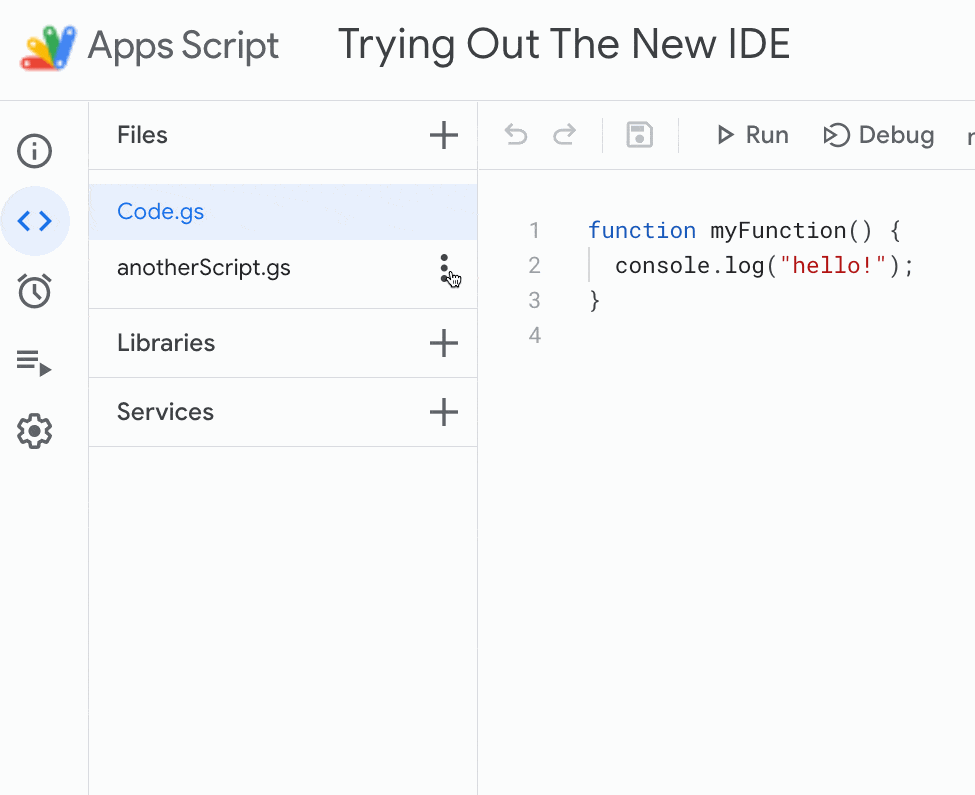
File Navigation Sidebar
To the right of the main menu, before the actual code editor, is another navigation panel with a list of your script files (.gs and .html file types), and any libraries or services you’re using.
13. File Navigation
The new Google Apps Script IDE lets you rearrange the order of the files in the file list.
Click on the three dots and select “Move Up” or “Move Down” to move files.
14. Libraries in sidebar
Any libraries used in your project are listed here, under the files. Add new libraries by clicking the plus button and entering the library ID.
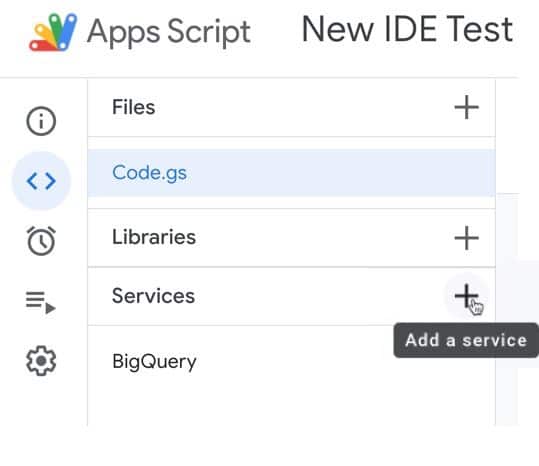
15. Services in sidebar
Any services used in your project are listed here.
For example, suppose you need to include the BigQuery Advanced Service. Click the plus button and then add BigQuery. It’ll then be listed in this sidebar.
You can choose a new Identifier for the service too:

Editor Context Menu
Admit it, we’ve all been in a situation when you can’t remember the definition of a variable in your code.
Previously you had to scroll up and down your code looking for the variable declaration or use Ctrl + F to search in your browser.
The new IDE includes a set of powerful code search tools that are a real boon for code editing:
Right click to access the Editor Context Menu.
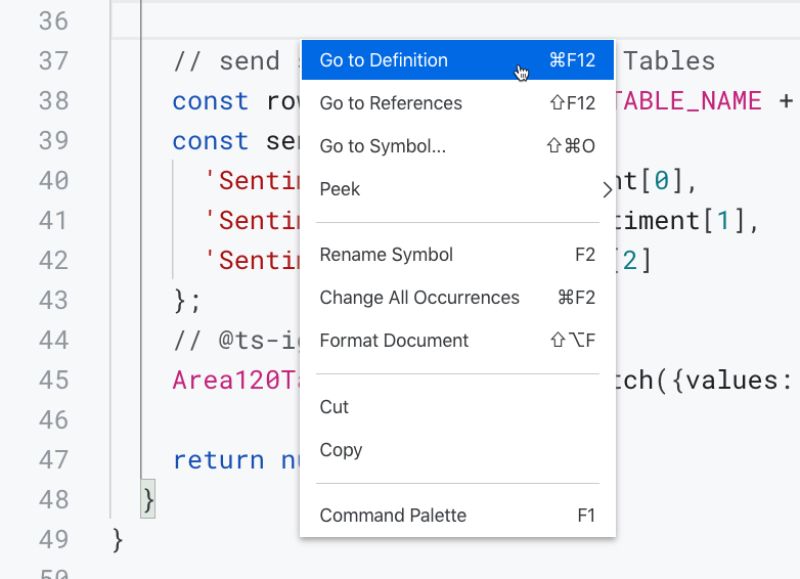
16. Go to Definition (Ctrl F12 or ⌘F12)
With your cursor on a variable or function, clicking on Go to Definition will jump your cursor to wherever this element is defined in your code.
If you try it with something that you don’t define in the code (e.g. like the built-in getRange method on SpreadsheetApp) you’ll see a popup message “No definition found for ‘XYZ’.”
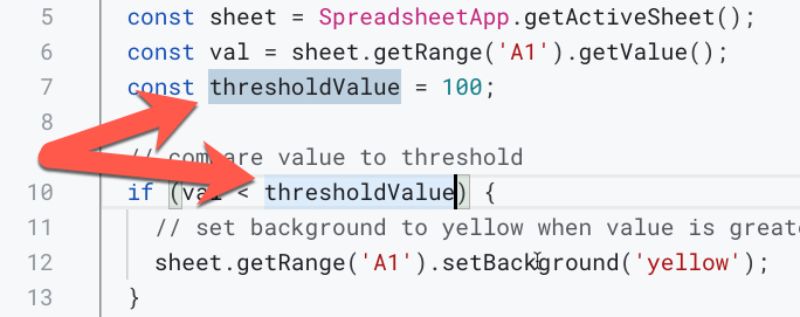
17. Go to References (⇧F12)
Go to References pops up an inline code window, showing all occurrences of the element, highlighted yellow. They’re also all listed on the right side of this inline window (not shown in this image). Hit X to close this window when you’re done.
⌘ Click on a Mac also brings up this inline Reference window.

18. Go to Symbol… (Ctrl Shift O or ⌘⇧O)
Clicking on Go to Symbol opens a search bar at the top of the editor, with a list of symbols in your script file. This gives you a quick and easy way to see all the names you’re using in your project and navigate to them.
19. Peek > Peek Definition (Ctrl Shift F10 or ⌥F12)
In the same way as “Go to References” above, Peek > Peek Definition opens an inline code window and shows the definition of the element your cursor is highlighting.
20. Peek > Peek Reference
This is the same as the Peek Definition above but it show all instances of the element, highlighted in the inline window.
21. Rename Symbol (F2)
Hit F2 or Right-click > Rename Symbol to rename elements everywhere.
This is a super useful feature because it lets you rename all instances of a variable at once.
It works flawlessly in one script file and on any global variables, but won’t change variables that are inside code blocks in different script files.
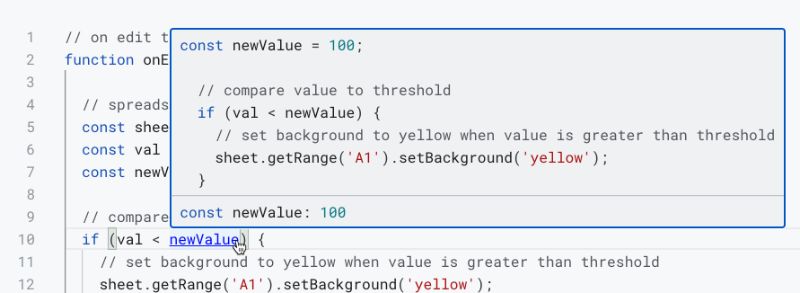
For example, suppose you want to rename “newValue” to “newVal” everywhere in your script file (i.e. where you declare it and anywhere it’s used). This feature lets you do that efficiently and safely.
22. Change All Occurrences (Ctrl F2 or ⌘F2)
This is another useful tool to let you modify all instances of a variable at once.
Right Click > Rename all occurrences actively selects all instances of that variable in your script file so that when you make a change it gets applied to all instances of that variable.
This tool does not work across multiple script files.
23. Format Document (Ctrl Shift I or ⇧⌥F)
Right click and select Format Document to automatically format your code and ensure it’s correctly indented.
24. Cut
I think you know what this one does…
25. Copy
And I think you can guess what this one does.
26. Command Palette (F1)
Brings up the Command Palette, which contains over 100 developer tools!
See below for full details of the command palette.
Logging & Debugging
27. Better logs
The new IDE has inline, real-time logging. It automatically shows the logs after execution.
I think this will be especially helpful for beginners who might otherwise miss where to access the logs.
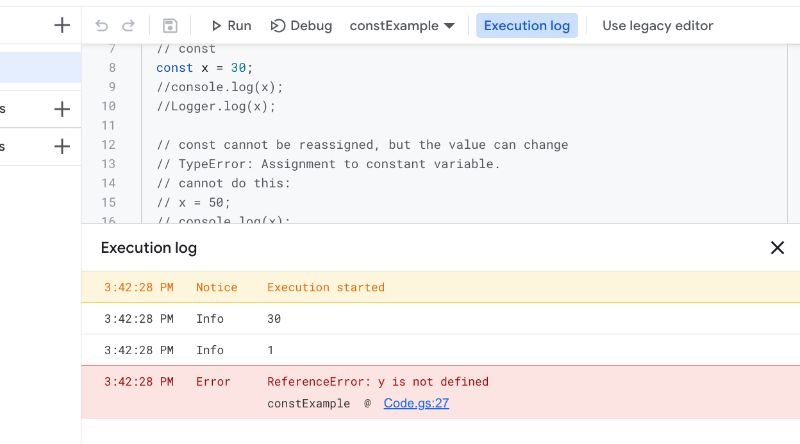
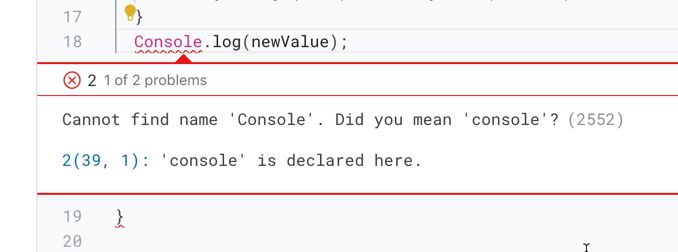
28. console.log
You can now use console.log() as well as Logger.log() to show information in the logger window.
Both of these log lines show up in the new IDE logger:
const x = 30;
console.log(x);
Logger.log(x);
This helps make code more portable. For example, if you build with Javascript outside of the Apps Script world you don’t need to switch all your Logger.log to console.log when moving from one environment to another.
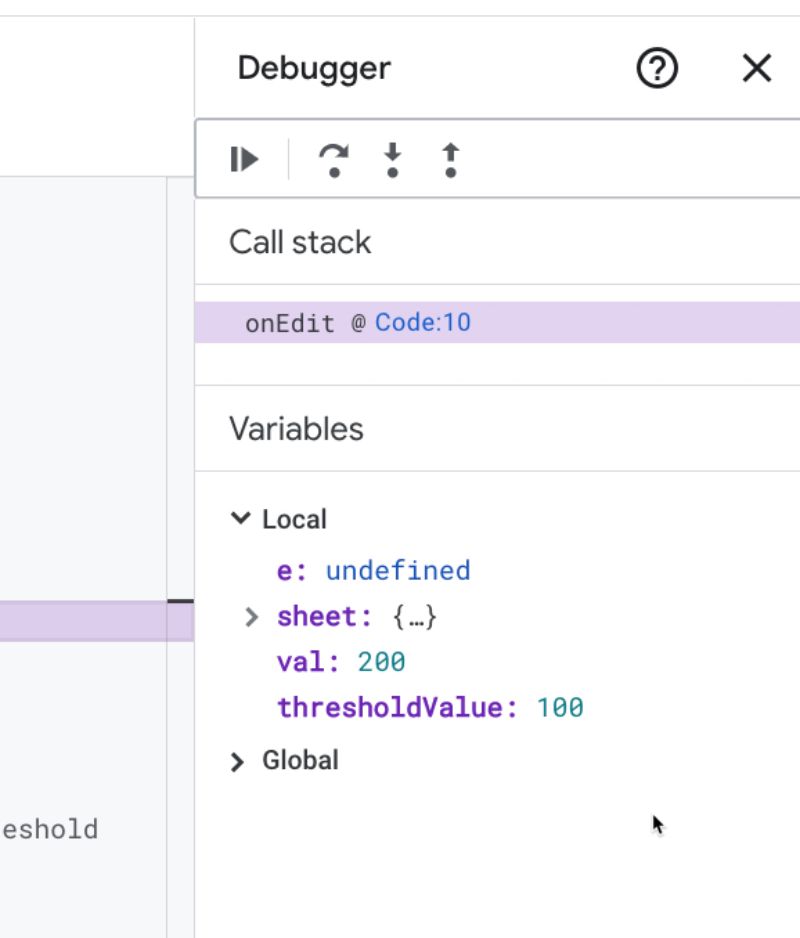
29. Debugging
The new Google Apps Script IDE has better error identification and a more detailed debugging environment.
Deployment In The New Google Apps Script IDE
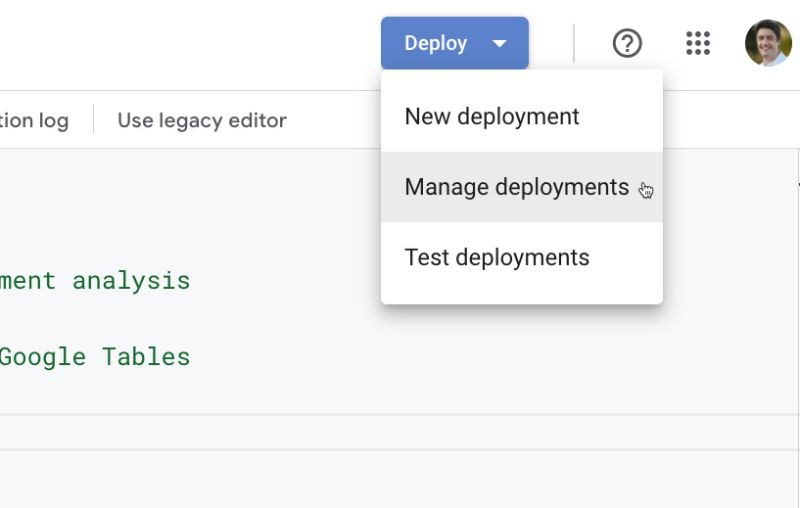
30. Better deployment menu
The deployment menu is now easier and faster to use.
You can manage your entire project lifecycle from the IDE window because everything has been consolidated into one place.
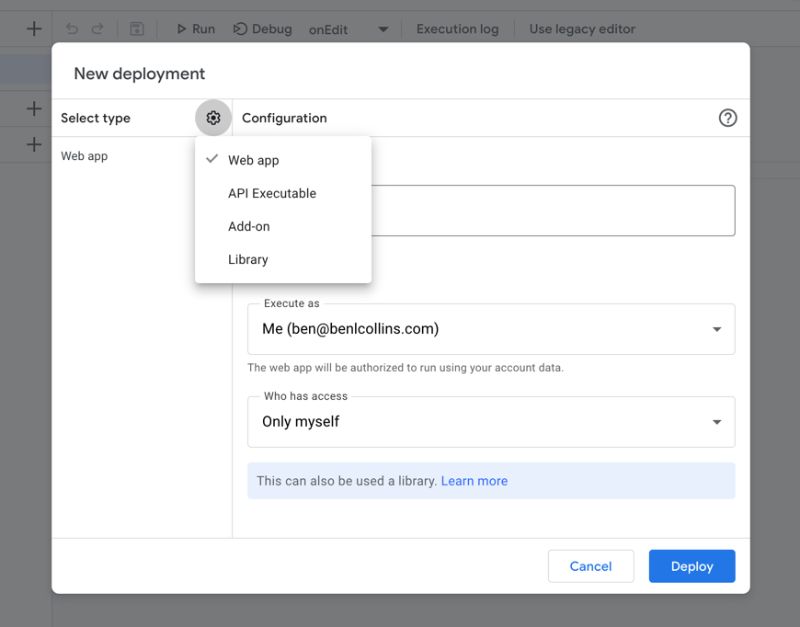
31. New Deployment
Option to create a new deployment.
A deployment is a version of your script that is used as a web app, API executable, add-on or library.
Deployments let you control the code version that your users use. You can maintain a stable production version of your code and a separate development version for testing.
32. Manage Deployments
This brings up the Manage deployments pane, which lists all active and archived deployments and their configurations. The configuration contains the Deployment ID and other details like who has access and the URL (if applicable).
33. Test Deployment
This is newly added and lets you quickly create a test instance of your project for testing.
💡 Learn moreLearn more about Google Apps Script in this free, beginner Introduction To Google Apps Script course
Command Palette
Hit F1 (or right click and select Command Palette) and open a book of magic spells.
Use the search bar or arrow keys to find the tool you’re after and apply it with the Enter key. Many of them also have shortcut keys, which are listed below in parentheses.
This searchable menu is chock full of 100+ developer tools:
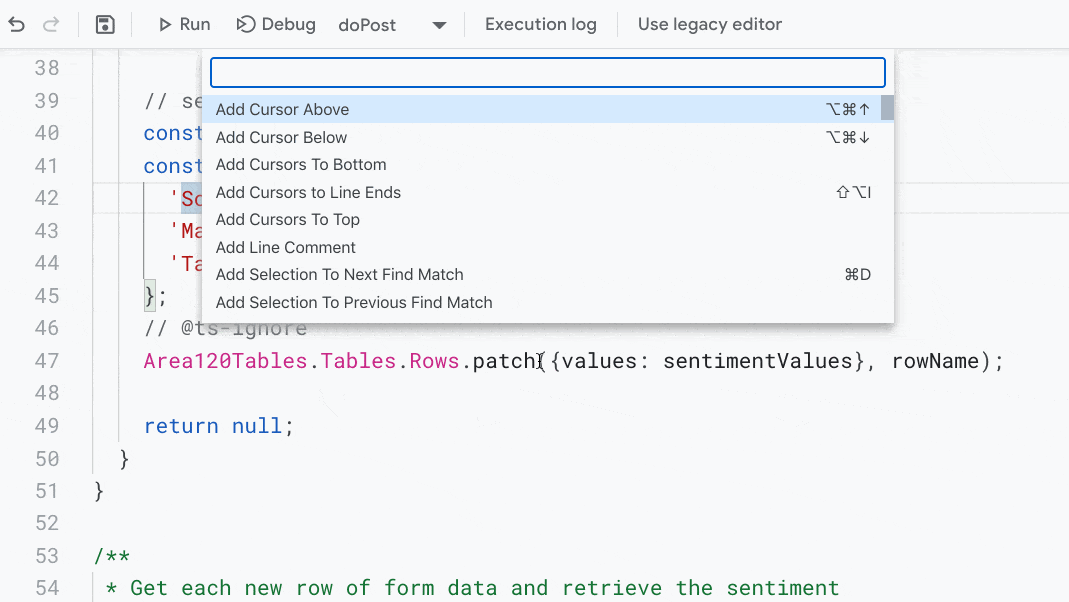
34. Add Cursor Above (Shift Alt ↑ or ⌥⌘↑)
Adds an additional cursor in the same position on the line above to allow multi-line editing.
Press Escape to exit the multi-line mode.
For more flexibility, press the Alt key whilst selecting multiple lines with your cursor anywhere.
35. Add Cursor Below (Shift Alt ↓ or ⌥⌘↓)
Adds an additional cursor in the same position on the line below.
36. Add Cursors To Bottom
Adds a cursor on every line below the current line (and including the current line). The cursor depth will match the current line or be at the end of a line if it has fewer characters than the current line.
37. Add Cursors To Line Ends (Shift Alt I or ⇧⌥I)
Adds a cursor to the end of every line in a selection.
38. Add Cursors To Top
Adds a cursor on every line above the current line (including the current line).
39. Add Line Comment
Turns the current line into a comment by placing “// ” at the front of the line, at the appropriate level of indentation.
40. Add Selection To Next Find Match (Ctrl D or ⌘D)
Helpful shortcut to select the current element. Pressing a second time selects the next occurrence of this element after the current one.
41. Add Selection To Previous Find Match
As with 40, it selects the current element and applying again will select occurrences of the same element before the current one.
42. Copy
Does exactly what it says on the tin!
43. Copy Line Down (Ctrl Shift Alt ↓ or ⇧⌥↓)
Creates a copy of the current line on a new line under the current line.
44. Copy Line Up (Ctrl Shift Alt ↑ or ⇧⌥↑)
Creates a copy of the current line on a new line above the current line.
45. Copy With Syntax Highlighting
Copies your code to the clipboard with the syntax highlighting.
(When pasting code into Google Slides, a regular Copy-Paste will also do this.)
46. Cursor Redo
This redoes your last cursor move. Only works when following a cursor undo action.
47. Cursor Undo (Ctrl U or ⌘U)
This undoes your last cursor move.
It lets you jump back to your previous cursor position, or re-highlight a block of code for example.
48. Cut
Yep, no, not going to explain this one 😉
49. Delete All Left (Ctrl Backspace or ⌘Backspace)
Delete everything to the left of your cursor on that line.
50. Delete All Right (^K)
Delete everything to the right of your cursor on that line.
51. Delete Line (Ctrl Shift K or ⌘⇧K)
Handy shortcut to delete an entire line of code. Useful or brutal, depending on your mood or your boss’s mood.
Thankfully you always have ⌘ + Z or Ctrl + Z.
52. Developer: Force Retokenize
Tokenization is how the editor assigns formatting (colors) to the tokens in your code.
Tokens are assigned to the different elements of your code, for example keywords (“new”) or operators (“+ – = > < /") and the tokens contain metadata (like the CSS code for the color). This Developer: Force Retokenize forces the tokenizer to refresh all the tokenization in your script file.
At the moment, with no way to customize tokens in the Apps Script IDE, I don’t think this tool is required for anything. However, it’s possible that it’s been added here for a future use case.
(Drop me a note or leave a comment if you have anything to add!)
Read more about Tokenization in VSCode here.
53. Developer: Inspect Tokens
This menu option adds a tooltip to your cursor that displays metadata about the token at your cursor position:
At the moment, the only way I could switch it off was to refresh the page.
54. Duplicate Selection
Duplicates a highlighted portion of code adjacent to the original (if it’s multiple lines, it’s below but starting on the last line of the original).
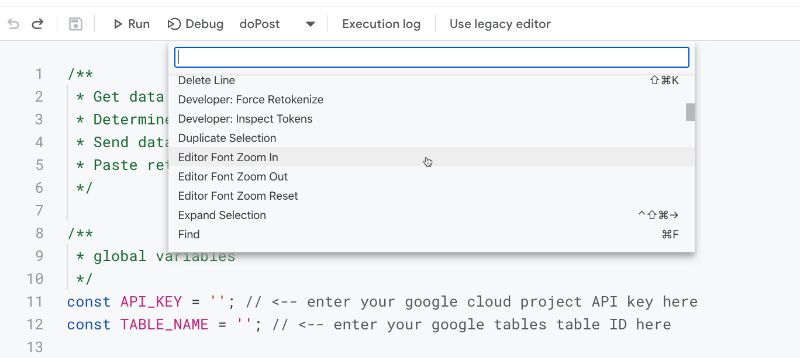
55. Editor Font Zoom In
Zoom in on your code window, without having to use the browser zoom.
This is helpful for us coders in middle age at the peak of our powers.
It’s a shame there’s no shortcut for zooming in/out.
56. Editor Font Zoom Out
Zoom out on the editor window.
57. Editor Font Zoom Reset
Reset the editor window to its default setting.
58. Expand Selection (Shift Alt → or ^⇧⌘→)
A quick way to highlight snippets of code. It expands the current highlight selection automatically.
For example, if you Expand Selection from the cursor position, it will expand to highlight that rest of that line. Press it again and it highlights the contents of that block.
59. Find (Ctrl F or ⌘F)
Opens the new Find and Replace bar.
It tells you how many instances of a given element are in your code. You can use the arrows to jump through these instances.
60. Find Next
Jumps to the next occurrence of whatever you have highlighted.
61. Find Next Selection (Ctrl F3 or ⌘F3)
Jumps to the next occurrence of whatever you have highlighted.
62. Find Previous (⇧Enter)
Jumps to the previous occurrence of whatever you have highlighted.
63. Find Previous Selection (Ctrl Shift F3 or ⌘⇧F3)
Jumps to the previous occurrence of whatever you have highlighted.
64. Find With Selection (⌘E)
Super handy shortcut to perform a search with the highlighted selection. This is a quicker way of doing a “Find” and typing in a search term.
65. Fold All
Folding is similar to the action of grouping rows and columns in your Google Sheet.
Folds up all the code blocks across your whole script.
66. Fold All Block Comments
Folds up all block comments.
I.e. it folds up all occurrences of /* ... */
67. Fold All Regions
Does not appear to do anything.
68. – 74. Fold Levels
Folds comments and code blocks at each level, leaving other levels unaffected:
- Fold Level 1
- Fold Level 2
- Fold Level 3
- Fold Level 4
- Fold Level 5
- Fold Level 6
- Fold Level 7
Note: your cursor needs to be one level up from the levels you want to fold. E.g. if you want to fold level 2, then your cursor needs to be at level 1.
75. Fold Recursively
Folds the current code block at the cursor and all regions inside it, i.e. all “downstream” code blocks such as functions that are called within the current code block.
76. Format Document (Ctrl Shift I or ⇧⌥F)
Fix all the indentation and spacing in your whole script file.
77. Format Selection
Fix all the indentation and spacing in a highlighted section of your code.
78. Go to Bracket (Ctrl Shift \ or ⌘⇧\)
This is a handy shortcut! Go to the opposite bracket of a pair.
With deeply nested blocks, it’s sometimes hard to see the bracket pairs so this is a welcome feature.
79. Go to Definition (Ctrl F12 or ⌘F12)
Jumps to where element is defined (see above).
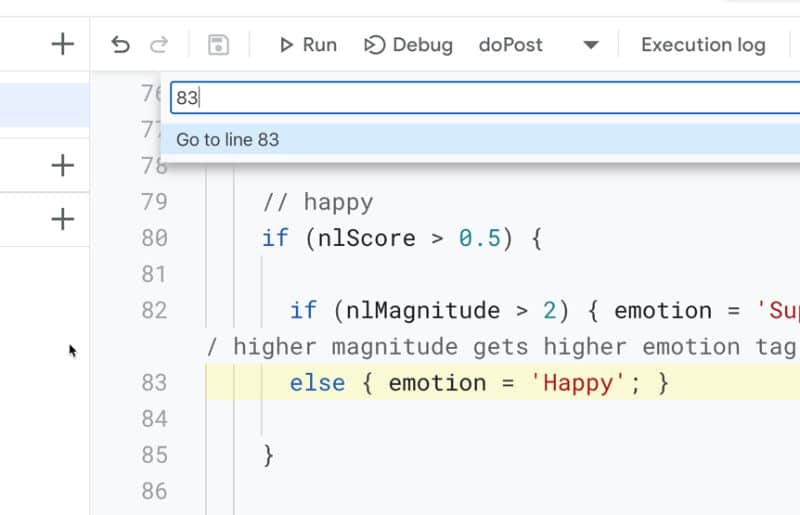
80. Go to Line… (Ctrl G or ^G)
Shortcut brings up an input box where you enter in a line number. It then takes your cursor there and highlight that line yellow.
81. Go to Next Problem (Error, Warning, Info) (Alt F8 or ⌥F8)
Shortcut to jump to the next error, warning or info highlight in your code. Useful to help you find errors in larger scripts.
82. Go to Next Problem in Files (Error, Warning, Info) (F8)
This appeared to be the same as “Go to Next Problem” above. It does not work across multiple script files.
83. Go to Previous Problem (Error, Warning, Info) (Shift Alt F8 or ⇧⌥F8)
Shortcut to jump to the previous error, warning or info highlight in your code. Useful to help you find errors in larger scripts.
84. Go to Previous Problem in Files (Error, Warning, Info) (⇧F8)
This appeared to be the same as “Go to Previous Problem” above.
85. Go to References (⇧F12)
Shortcut pops up an inline code window, showing all occurrences of the element, highlighted yellow (see details above).
86. Go to Symbol… (Ctrl Shift O or ⌘⇧O)
Opens a search bar at the top of the editor with a list of symbols in your script file (see details above).
87. Indent Line (Ctrl ] or ⌘])
Menu item and shortcut to indent a line. Same as Tab.
88. Insert Line Above (Ctrl Shift Enter or ⌘⇧Enter)
Shortcut to insert a new line above the line of code you’re currently on.
89. Insert Line Below (Ctrl Enter or ⌘Enter)
Inserts a new line below the current line. Appears to behave the same as single Enter.
90. Join Lines (^J)
Shortcut to join lines by moving the line below into the same line as the cursor. The line below is moved to the end of the existing line with a one space gap between them.
91. Move Caret Left
Moves your cursor one character to the left.
92. Move Caret Right
Moves your cursor one character to the right.
93. Move Last Selection To Next Find Match
Moves your highlighted selection to the next instance of that section of code.
For example, with sheet.getRange highlighted, when you use this feature it jumps your highlighted selection to the next instance of sheet.getRange.
94. Move Last Selection To Previous Find Match
Moves your highlighted selection to the previous instance of section of code.
95. Move Line Down (Alt ↓ or ⌥↓)
Shortcut to move lines down. It works with single lines or blocks, so it’s really useful for rearranging your code.
96. Move Line Up (Alt ↑ or ⌥↑)
Shortcut to move lines up. It works with single lines or blocks, so it’s really useful for rearranging your code.
97. Open Definition to the Side
This opens the inline definition pane for the element selected, for example a variable or function.
98. Open Link
With your cursor on a link in your code, this menu item will (attempt to) open that link in a new browser tab.
Same as Ctrl + Click (PC and Chromebook) or ⌘ + Click (Mac)
99. Outdent Line (Ctrl [ or ⌘[)
Outdent (reverse indent) a line. Same as Shift + Tab.
100. Peek Definition (Ctrl Shift F10 or ⌥F12)
Opens an inline code window, highlighting the definition of the element (see details above).
101. Peek References
Opens an inline code window, highlighting all instances of the element (see details above).
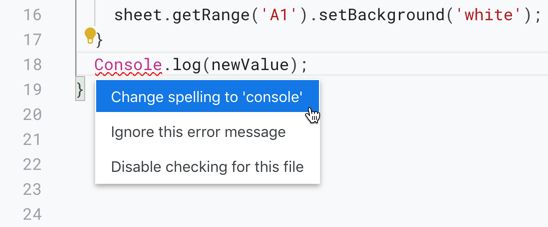
102. Quick Fix… (Ctrl . or ⌘.)
Opens the quick fix menu with the suggested fix or the option to ignore this error:
103. Refactor… (Ctrl Shift R or ^⇧R)
Source code refactoring options from within the code editor. The popup will suggest code improvements.
I haven’t used this yet so I’ll add more here when I have more experience with it.
104. Remove Line Comment
Removes “// ” at the front of code lines, to turn them from comments into code.
This is the opposite functionality to item 39 which adds a line comment.
105. Rename Symbol (F2)
Shortcut to rename elements everywhere (see details above).
106. Replace (Ctrl H or ⌥⌘F)
Opens the replace function, with anything highlighted in the Find search bar.
107. Replace with Next Value (Ctrl Shift . or ⇧⌘.)
Shortcut to increment an integer by 1.
E.g. with 100 highlighted, pressing this shortcut will change it to 101, then 102, then 103 etc.
108. Replace with Previous Value (Ctrl Shift , or ⇧⌘,)
Shortcut to decrease an integer by 1, so 100 becomes 99, becomes 98, etc.
109. Select All Occurrences of Find Match (Ctrl Shift L or ⇧⌘L)
Highlights and selects all occurrences of the element at the cursor position.
110. Select to Bracket
Helpful feature to select a block of code between curly brackets {…} or parentheses (…)
111. Show Accessibility Help (Alt F1 or ⌥F1)
Pops open the accessibility widget, which gives information about accessibility options available in the new editor.
112. Show Definition Preview Hover
Pops up a widget showing the definition of the selected element:
113. Show Editor Context Menu (⇧F10)
Shortcut to open the Editor Context Menu in the Google Apps Script IDE. Same as right click to open the menu.
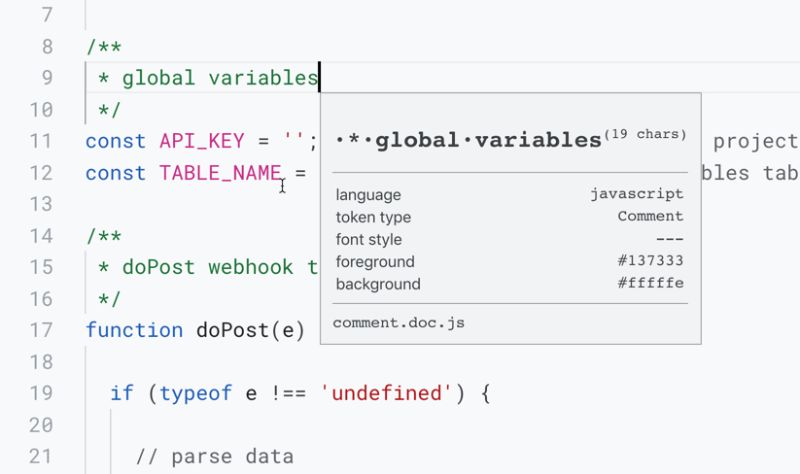
114. Show Hover
Pops up a widget showing limited information about the element selected:
115. Shrink Selection (Shift Alt ← or ^⇧⌘←)
Shrinks the current selection. It’s the opposite action of #58 Expand Selection.
116. Sort Lines Ascending
Sorts highlighted lines of code in alphabetical ascending order, by the first character.
117. Sort Lines Descending
Sorts highlighted lines of code in alphabetical descending order, by the first character.
118. Source Action…
Not clear what this does in the editor. I’ll add more here when I have more experience with it.
119. Toggle Block Comment (Ctrl Shift A or ⇧⌥A)
Shortcut to create a block comment. Adds the following code:
/* */
120. Toggle Fold
Hides or shows the code block.
This is the same functionality as clicking the triangles next to the code lines (see #5 above).
121. Toggle High Contrast Theme
Press F1 > search for High Contrast Theme
High contrast mode is built into the new Google Apps Script IDE
Wow, this is a nice addition from the Apps Script team. High contrast mode!
If you like to work in dark mode, then you’re covered:
122. Toggle Line Comment (Ctrl / or ⌘/)
Toggles a line as a comment or not. It’s the same as actions #39 and #104.
123. Toggle Tab Key Moves Focus (Ctrl M or ^⇧M)
Toggles between the tab key acting inside the editor (e.g. to indent code) or outside the editor (e.g. to navigate different menus of your browser window).
124. Transform to Lowercase
Transform all letters in a selection to lowercase.
This affects all letters, regardless of whether they’re user defined variables or Javascript keywords.
125. Transform to Title Case
Transform all letters in a selection to title case.
126. Transform to Uppercase
Transform all letters in a selection to uppercase.
127. Transpose characters around the cursor
Transposes characters either side of the cursor.
E.g. turns “a1” (with the cursor between the a and 1) into “1a” (with the cursor after the a).
128. Transpose Letters (^T)
Transposes letters either side of the cursor.
E.g. turns “ab” (with the cursor between the a and b) into “ba” (with the cursor after the a).
These two transpose operations appear to do the same thing in this IDE.
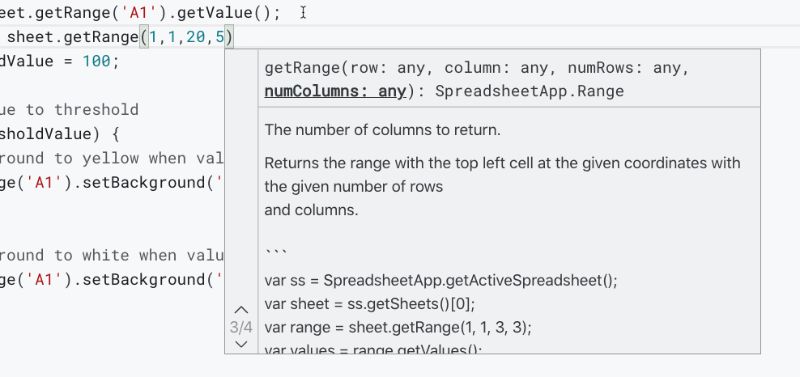
129. Trigger Parameter Hints (Ctrl Shift Space or ⇧⌘Space)
Shortcut to open the auto-complete widget that shows context for the parameters of a method.
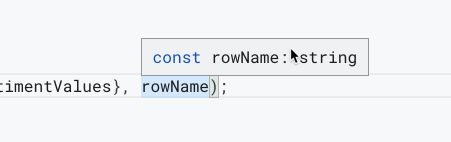
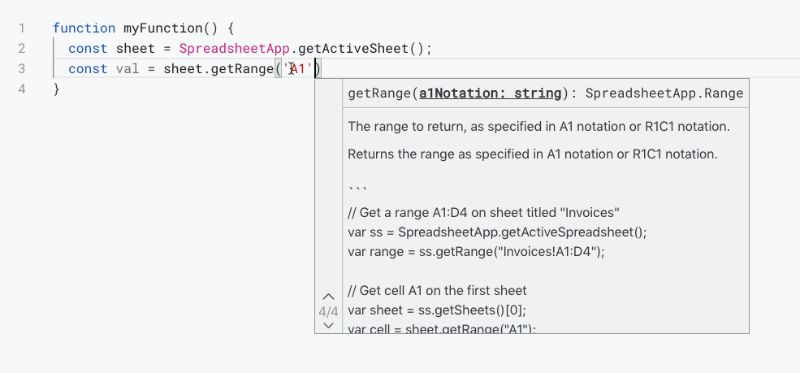
For example, sheet.getRange('A1') shows information about the A1 notation parameter:
130. Trigger Suggest (Ctrl Space or ^Space)
Shortcut to open the auto-complete widget.
131. Trim Trailing Whitespace
Removes all whitespace from the end of lines.
132. Unfold (Ctrl Shift ] or ⌥⌘])
Shortcut to unfold the current code block.
133. Unfold All
Unfolds (opens) all folded code blocks in your script file.
134. Unfold All Regions
Does not appear to do anything.
135. Unfold Recursively
Unfolds the current code block at the cursor and all regions inside it.
Resources
The new Google Apps Script IDE is based on VSCode so the VSCode docs are useful for a much deeper look at all of the features discussed in this guide.
If you’re new to Apps Script, have a read of this post: Google Apps Script: A Beginner’s Guide
Following on from that article, you can sign up for my free course: Introduction To Google Apps Script

Introduction To Google Apps Script is 25 lessons that will take you from absolute beginner to comfortable Apps Script user, able to create small scripts to automate your work and save yourself time.
All the videos feature the brand new Google Apps Script IDE and v8 Apps Script code (released earlier in 2020) so they’re bang up-to-date!
Hi Ben, thank you very much for this information. I’m very happy with it!
BTW: Isn’t 55 and 56 not the same as CTRL + and CTRL – on the keyboard?
It’s different. It zooms in (or out) on the code window only, unlike Ctrl +/- that zoom in the whole browser window, including menus etc.
thanks Ben, great overview!
Thank you for this extensive guide.
Super excited to start working with this. Have been using AppScripts for going on 2 years, and have been highly annoyed by the logging, suggestions, and autocomplete features.
Do you know if these features are available / responsive to coding with a smartphone?
Is/Will there be a word wrap feature?
Also, #55 Font Zoom, “middle-age” coders,
Does debug permit to edit variable values live while debugging?
Is there an immediate window in which you can run some print commands and change values or run small pieces of code?
This is outstanding documentation! Thanks for putting this together. Google definitely upped their game with these new features. I was just beginning to get comfortable hitting alt / (old way of autotyping a variable).
I don’t have the new IDE yet, but regions seem like they’re a feature borrowed from VS Code: they let you define your own points for collapsing chunks of code.
Assuming it works like VS Code does, you can make them like this:
//#region Functions a, b, and c
function a() {
}
function b() {
}
function c() {
}
//#endregion
That should then add a down arrow at the first comment; clicking it should then collapse everything in the region.
Why are uppercase words colored pink?
… oh…actually it’s just words that start with an uppercase letter.
Anyone?
Thank you for a very good overview and guide for the new IDE.
Two omissions from the new editor (unless I missed seeing them) that caused me to immediately revert back to the old editor were:
– No ability to sort script files within a project alphabetically. With upwards of 20+ script files in a project, I developed a number prefix naming convention to allow me to easily order and group script files in the file list. I see there is an option now to move files up and down within a list, but I find that more time consuming and cumbersome to work with.
– No ability to do a keyword search across all script files within a project.
I’ve provided the above comments in the Editor Opt-out Survey. Hopefully the Google development team will listen and add those features in a later release of the editor.
Hi GNelson,
To your first point, check out this file sorter from Romain Vialard: https://github.com/RomainVialard/sort-apps-script-files
Re the search across files, I have not seen a way to do this either.
Cheers,
Ben
not being able to search in all files really SUCKS
I agree completely, these two features are critical to our future use of the new IDE.
Totally insane that they left out the ability to search all project files. The old IDE did that bang on. Now it’s back and forth between the new and old editor to search and having your active files closed for you in the process. Jeez!
Now that Google has announced the turning off of the legacy editor effective this September I’m forced to make the switch the new editor.
Noticed in making the switch a previous complaint about not being able to sort files within a project alphabetically has been addressed, although there is one small bug in that feature. Editing a file name won’t automatically place the new file in the correct order, but instead turns off sort files alphabetically. Easy enough to turn it back on, so only a minor annoyance.
Still lacking though is the ability to search for text across all files in a project. Fortunately I came across a post elsewhere that led me to a Chrome extension (Black Apps Script: https://chrome.google.com/webstore/detail/black-apps-script/lobpcflajoikohefjjdndofbfikadpfb/related) that adds that functionality.
Shame Google developers don’t have the skills to build that in to the editor, but instead rely on others to write an extension to provide that very important and needed functionality. 🙂
Wow! How did I miss the Black Apps Script!
Excellent – thank you for pointing this out!
Roy
How colud I open my Script in the old IDE? I have some problems inn the new one.
Although I can toggle dark theme, I can’t seem to get it to stay that way. It reverts back to the light theme whenever I reopen the page.
Yes, happens for me too! You should submit that as feedback.
Bravo Ben! I really appreciate your posts, in Italy you are becoming famous ;o) …
You did a great job!!!
Hi,
Thanks for your video. I have a question : How can I change the old Script with the new script IDE…
When I’am connected to script Sheet with my own count : it’s old script… When I connect with another count : it’s new script.
Bests Regards
Wow. Excellent post. I do have one question though.. the one thing that seems to be lacking in comparison to the old editor is Find (within ALL files attached to the spreadsheet). The new Find function seems to only be able to search within the currently open file (one only) and does not show occurrences in other files belonging to the same project/spreadsheet. Am I missing something ?
Thank you!
Uros
I don’t think you are missing anything. The new IDE does not appear to have that capability. Hard to believe that is missing from an IDE. It is about as fundamental a capability as there is.
Bizarre – I bumped into this problem within two minutes of using the new IDE. Difficult to believe this is missing!
I agree that this is a problem, though I wonder if the product team would not argue that you already have Find in your browser. I find the lack of smart find almost dealbreaking.
Awesome man. Thanks a lot.
There’s no setting to change the time zone in new editor as far as I can see. And because of the time zone mismatch I ran into tremendous number of bugs.
The lack of search across multiple script files seems to be the most serious defect of new IDE.
Apart from this it is a great improvement … but we really do need to be able to search across all script files in the project.
Amen, brother. I have to copy-paste all my script files into a Google Doc and search from there. “Hit it out of the park” is, ummm……
Also missing from new IDE is file version history.
Really great walk-through in the video and all the other details. Thanks.
Can only repeat what others have already written here: The missing ability to search across script-files is a bummer!
But besides from that, I’m really excited.
My previous code did not word wrap, and it’s making the older things I’ve written really hard to read. Any idea how to turn OFF word wrapping please?
Txs a lot for sharing, Ben.
great news indeed.
Thanks for this!
Do all the shortcuts work for Chromebooks though? I’ve found that the ones I’d really like (move line up/down) don’t work on my Acer Chromebox keyboard.
I’m guessing they’re mapped to a system shortcut. Any ideas on getting the IDE to overrule any other settings?
Hi!, Thanks a lot, for this great post.
But, canyou help me: Do you know how to open múltiple files?
Its really hard to code having just one file visible. No tabs like previous version.
Thanks again!
You can duplicate the browser tab and have the IDE open twice, with a different file selected in each window.
In the sidebar list of files when hovering over the three dots there are choices to move the files up or down. I did this, but to my chagrin, although the names of the files moved a slot either way, the contents remained in the same place so then the labels did not correspond to the contents. Seems a bug to me.
Were you aware?
Give it a go and see if it happens to you.
All the Best,
Hello Ben,
I love the new IDE more and more, not even sure if I like my VScode now.
I was thinking about this:
which deployments do you usually use when doing internal script that are file bound and might only be up to a couple 100 lines long, but are not exactly Libraries, web apps or meant as add ons (though they technically are a custom file bound add on).
Why I am asking? Because e.g. going for add on means changing the GC project etc. and I am looking the the most optimal simple, quick way to just use deployments for versions – a must have for those moments when you just mess it up and need to go back :).
My take: I use the library deployment. The only issue I see is that with the ID the project can be accessed? And therefore using e.g. code with API key etc is potentially problematic (although very unlikely one would figure out the library ID by chance) if not using it the script properties to save those.
you can press Ctrl + R (Windows) to Run