Data Studio is relatively new dashboard tool from Google, launched in mid-2016. It’s a superb tool for creating professional looking reports, easily and quickly, and it connects seamlessly to other Google data sources (e.g. Analytics, AdSense, Sheets, …).
Here’s an introduction to Data Studio and a look at the more advanced features.
Do you work with data outside of Google’s ecosystem though?
I’ll go out on a limb here, and say, yes, most likely you do.
Perhaps you’re a digital marketing analyst looking at Facebook, Twitter, Instagram, MailChimp data (etc…) for example.
Many of us work with other web services and you want that data displayed in Data Studio. With the launch of native data Community Connectors, you can connect to your favorite web services and access data that lives outside the Google ecosystem directly!
What is a Data Studio Community Connector?
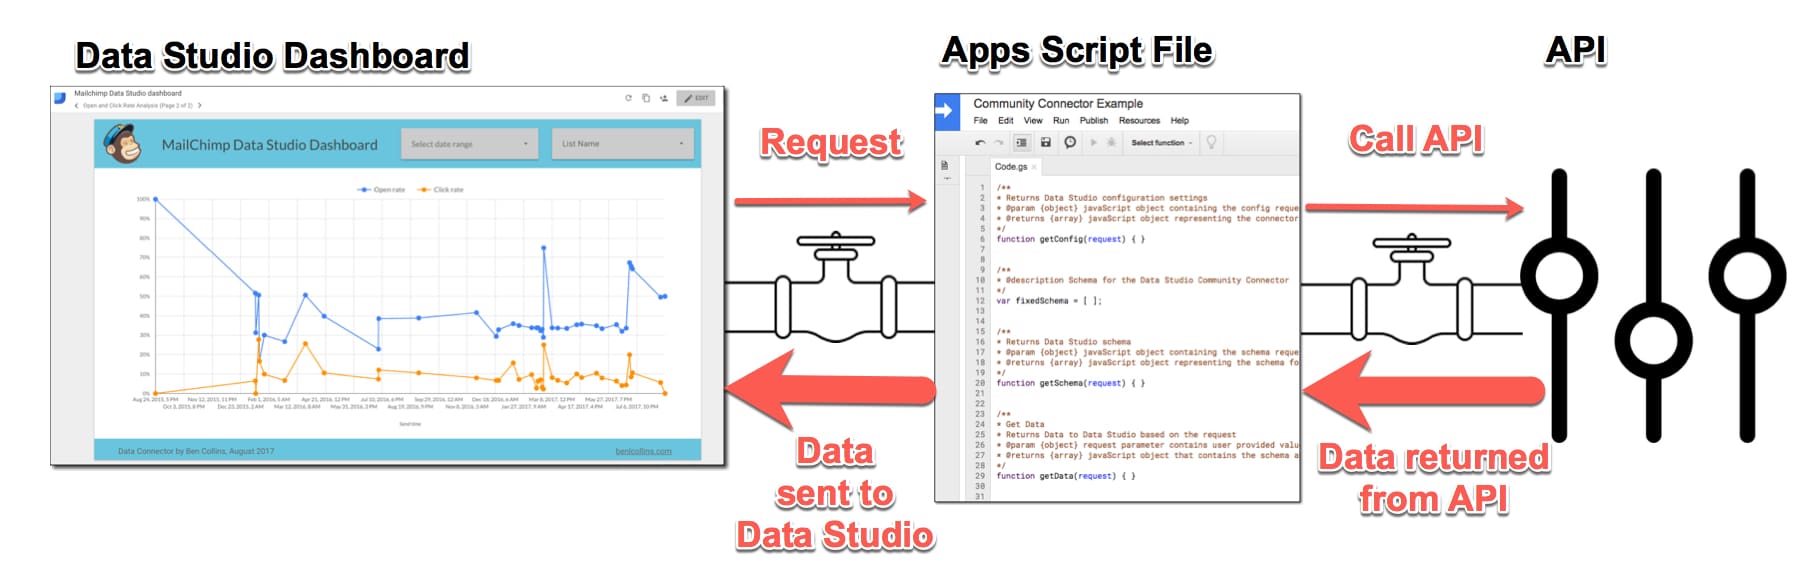
The easiest analogy is to think of a Community Connector as a pipeline between Data Studio and your favorite web service, where your data exists. Data Studio sends a request to your web service and it returns the requested data through this pipeline, so you can analyze and visualize it in Data Studio.
A Community Connector is actually an Apps Script application that lets Data Studio users return data from external 3rd party sources, by querying the API (Application Programming Interface).
Learn more about Apps Script here. Learn more about working with APIs using Apps Script here.
It means you can get your data into Data Studio.
It means no more messing around with a Google Sheet acting as a middleman for your data.
Simply install the Community Connector, and connect Data Studio to your data.
If you’re so inclined, and you know a little Apps Script and APIs, you can even build your own.
How to use ready-built Community Connectors
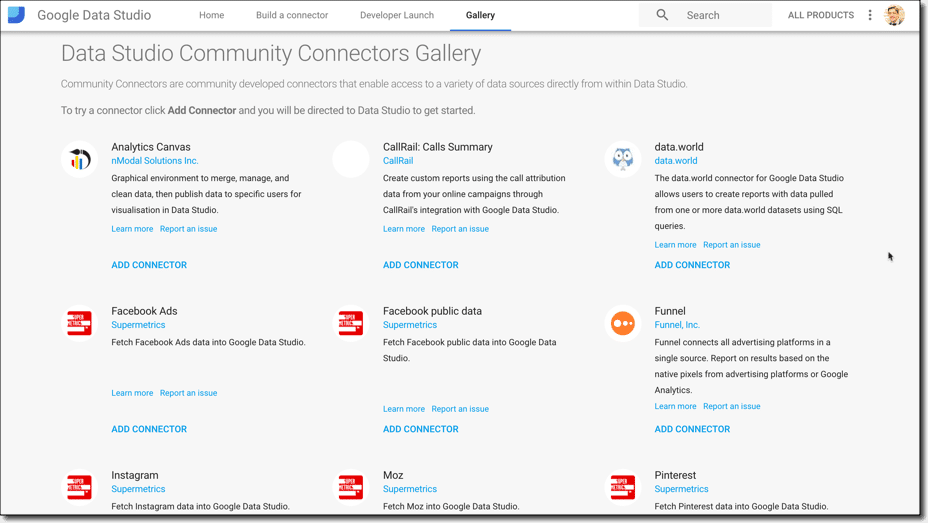
There’s a lot of new connectors available (with more becoming available all the time), and you can see them in the gallery here:
Select a Community Connector and add it directly to your blank Data Studio report.
Once you have added and authorized the Community Connector, it’ll be listed as a Data Source in your Data Studio environment, and you can just use it as normal in your Data Studio reports.
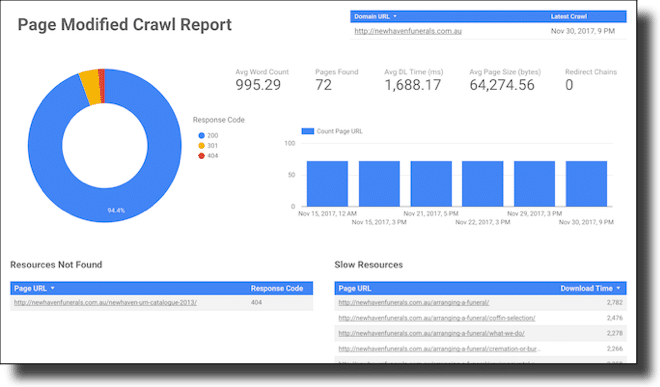
In late 2017, I built a Data Studio connector for Page Modified, which is now available in the connector gallery here (search for Page Modified). Page Modified is a web-based site audit and monitoring platform and this connector allows you to automatically pull your crawl data into Data Studio.
For developers, you can also create and add connectors using Apps Script.
How to create a Data Studio Community Connector with Apps Script
This section is a quick introduction to Community Connectors from a developer’s perspective.
A Community Connector connects to an external API, which may or may not require authentication, fetches the data and passes it back to Data Studio.
I’ve been built two client connectors (this one is in the gallery) and various prototype connectors, and they’re awesome! It’s very cool when you see your data visualized in Data Studio.
Let’s discuss the build process and see some example dashboards built with native data connectors.
Creating a Community Connector without authentication
It’s probably easiest to begin with a public, read-only API, with a simple data structure and no authentication to worry about.
There are four key functions to any Community Connector application and they:
- Configure the Community Connector (any user configuration options for the connector)
- Define the schema (the organization and types of data)
- Fetch the data from the API and pass it to Data Studio
- Handle any authentication
The starting point for any Community Connector is a standalone Apps Script project.
Create one and in the Code.gs file delete the blank myFunction() function.
Any Community Connector will have a skeleton outline like this, showing the four key functions mentioned above:
function getConfig(request) {
  var config = {
    configParams: [
      // Any user configuration options for the connector.
    ]
  };
  return config;
};


var exampleSchema = [
  {
    // The schema for the given request, providing information on the organization and type of data.
  }
];

function getSchema(request) {
  return {schema: exampleSchema};
};


function getData(request) {

  // Fetch the data with UrlFetchApp, e.g.:
  var url = "https://example.com/api/"
  var response = UrlFetchApp.fetch(url);

  // Prepare the schema for the fields requested.
  // ...

  // Prepare the tabular data.
  // ...

  // Return the tabular data for the given request.
  return {
    schema: dataSchema,
    rows: data
  };
};


function getAuthType() {
  // Returns the authentication method required.
  var response = {
    "type": "NONE"
  };
  return response;
}
See an example of a completed Community Connector script file here (the International Space Station example below).
The heart of the application is the getData() function, which takes a request from Data Studio as an input (basically what data is being asked for) and makes the call to the API to fetch that data.
Then it wrangles the data into the correct format for Data Studio (defined by the schema you’ve created) and passes it back to Data Studio.
The getAuthType() will return the authentication method required, in this case NONE, as no authentication is required for this API.
Extra functions are required if you need to use OAuth 2 verification (see below).
Hint: Sprinkle the Logger.log() class liberally through your Apps Script code to understand how the data connector works. For example, adding a Logger.log(request) as the first line of the getData(request) function will show you the format of the request variable, which looks like this in the case of the GitHub Community Connector example:
{
  configParams={username=benlcollins},
  scriptParams={lastRefresh=1502468631854},
  fields=[
    {name=commit_value},
    {name=followers},
    {name=following},
    {name=public_repos},
    {name=updated_at}
  ]
}
This tells you any configuration parameters, what fields are being requested by Data Studio, and what those variables are called, so you can refer to them correctly in your code.
Google have published some example tutorials of building Community Connectors (using the Font API here and the Open Weather API here).
Deploy the Community Connector
After writing the code, there’s a final step in the Apps Script editor before you can connect to your Community Connector from Data Studio.
Click on View > Show manifest file, which will open a new appsscript.json manifest file next to Code.gs.
You’ll need to add the dataStudio name into your manifest file, so the final file should look something like this:
{
  "timeZone": "America/New_York",
  "dependencies": {
  },
  "dataStudio": {
    "name": "Name of Community Connector",
    "company": "Ben Collins",
    "companyUrl": "https://www.benlcollins.com/",
    "logoUrl": "https://www.benlcollins.com/",
    "addonUrl": "https://www.benlcollins.com/",
    "supportUrl": "https://www.benlcollins.com/",
    "description": "Connect Data Studio to web service"
  }
}
You specify the name of your Community Connector in the manifest file.
Save your Apps Script project.
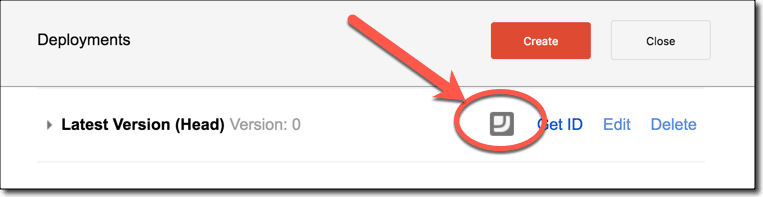
Click the menu: Publish > Manage Deployments
You should see the Deployments screen with Head Deployment listed as the initial deployment.
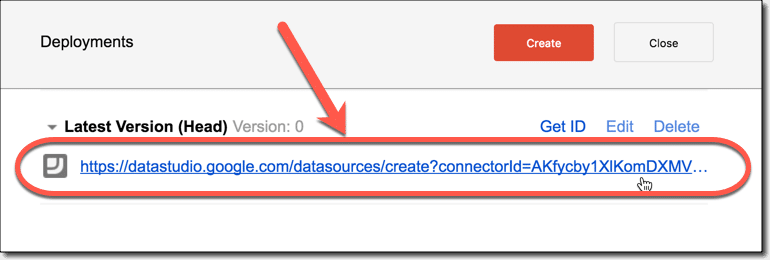
Click on the deployment name (Latest Version (Head)) or the Data Studio icon next to the Get ID link, which will show the connector link into Data Studio for this connector:
Click on this connector link to open up a new Data Studio report with this Community Connector added:
Use the Community Connector in Data Studio
The Community Connector will now be selected and also listed under the Community Connectors in the left pane:
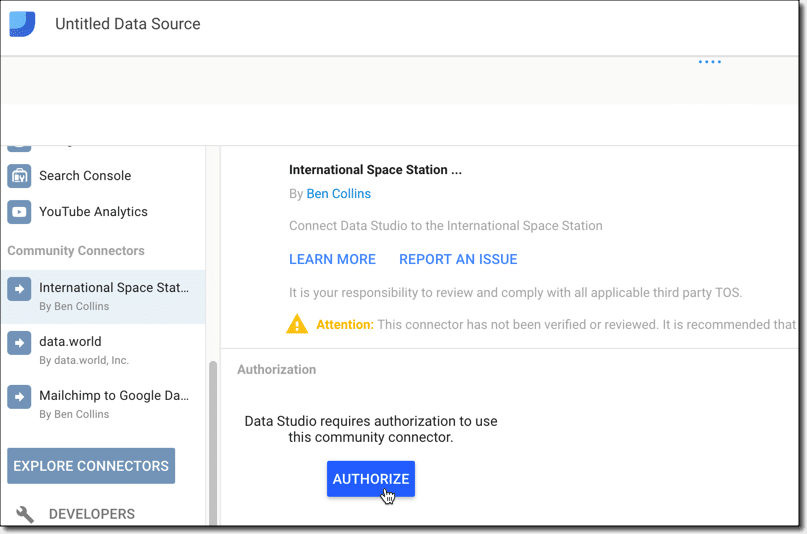
You’ll need to grant any authorizations required to allow your Community Connector access to the web service.
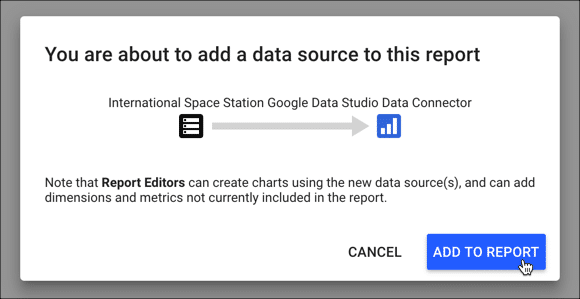
Now you’re back on familiar territory of Data Studio reports, where you can add the Community Connector data source to your report:
Community Connector example 1: International Space Station location
For fun, I tried plotting the current position of the International Space Station in a Data Studio dashboard, using the Open Notify API, a simple, public API not requiring any authentication.
The Open Notify API gives the current position of the International Space Station.
Here’s a screenshot of the final International Space Station Data Studio dashboard, with the red dot on the map showing the current position of the ISS:
When you hit refresh in the dashboard, it updates and the red dot moves on the map to show the current position of the ISS.
Want to see this Data Studio dashboard? Check it out here.
Here’s my code from this International Space Station API example.
Creating a Community Connector with OAuth 2 authentication
Of course, most web services will require some form of authentication before you can extract data.
Thankfully, the hard work has been done for us with the OAuth2 Apps Script library.
Under the Community Connector documentation, there’s a lot of information on creating OAuth 2 Data Connector applications.
So the first step is to add this OAuth2 library to your project, via the menu Resources > Libraries... > Add Library
In addition to the skeleton outline above, you need to add a few extra functions to your Community Connector to handle the authentication:
- The
getOAuthService()contains the configuration information for the given OAuth2 provider. - The
authCallback()invokes the callback function you specified for your service, when the user completes the OAuth 2 workflow. isAuthValid()checks if the 3rd-party service credentials are valid.
So let’s see an example of an authenticated data connector, in this case with a connection to the GitHub API.
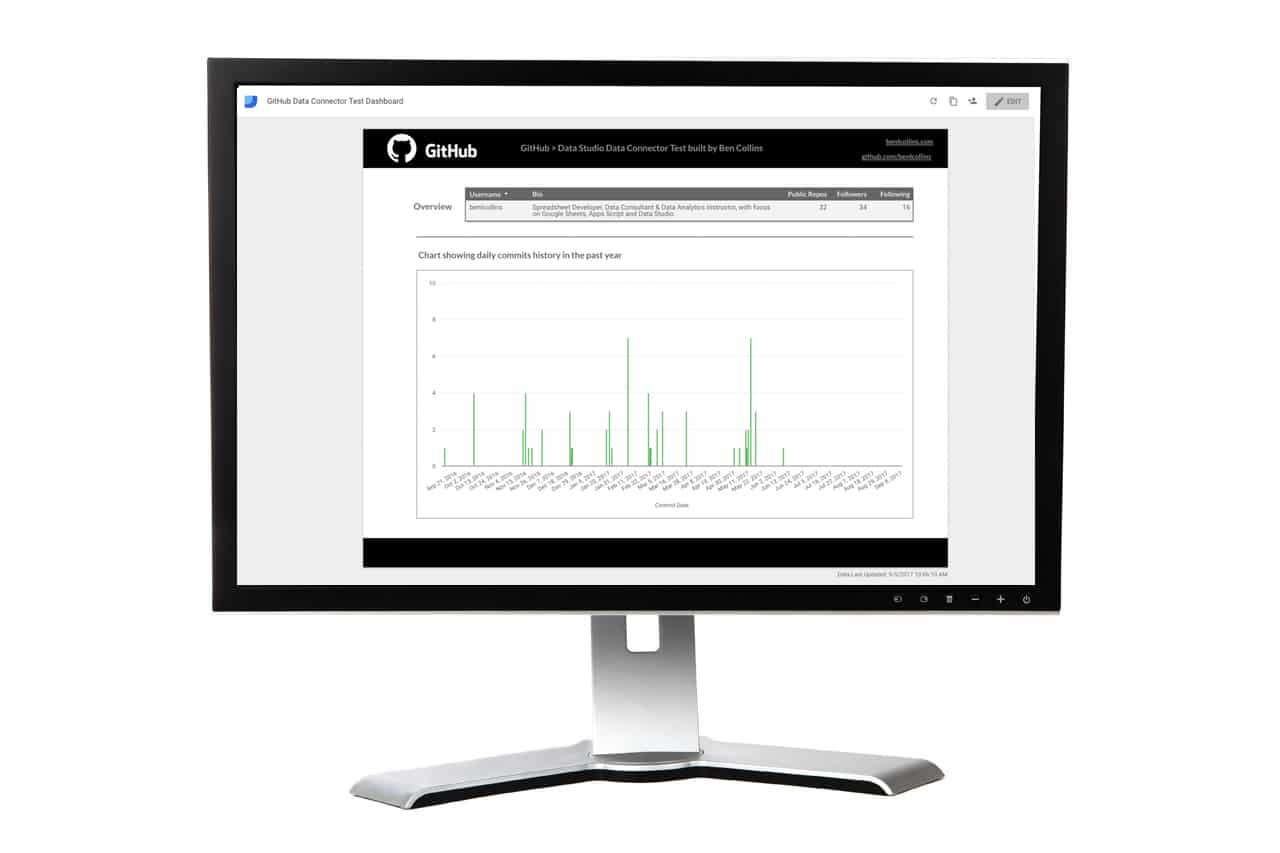
Community Connector example 2: Authenticated GitHub connector
The code is very similar to this code in my OAuth article here.
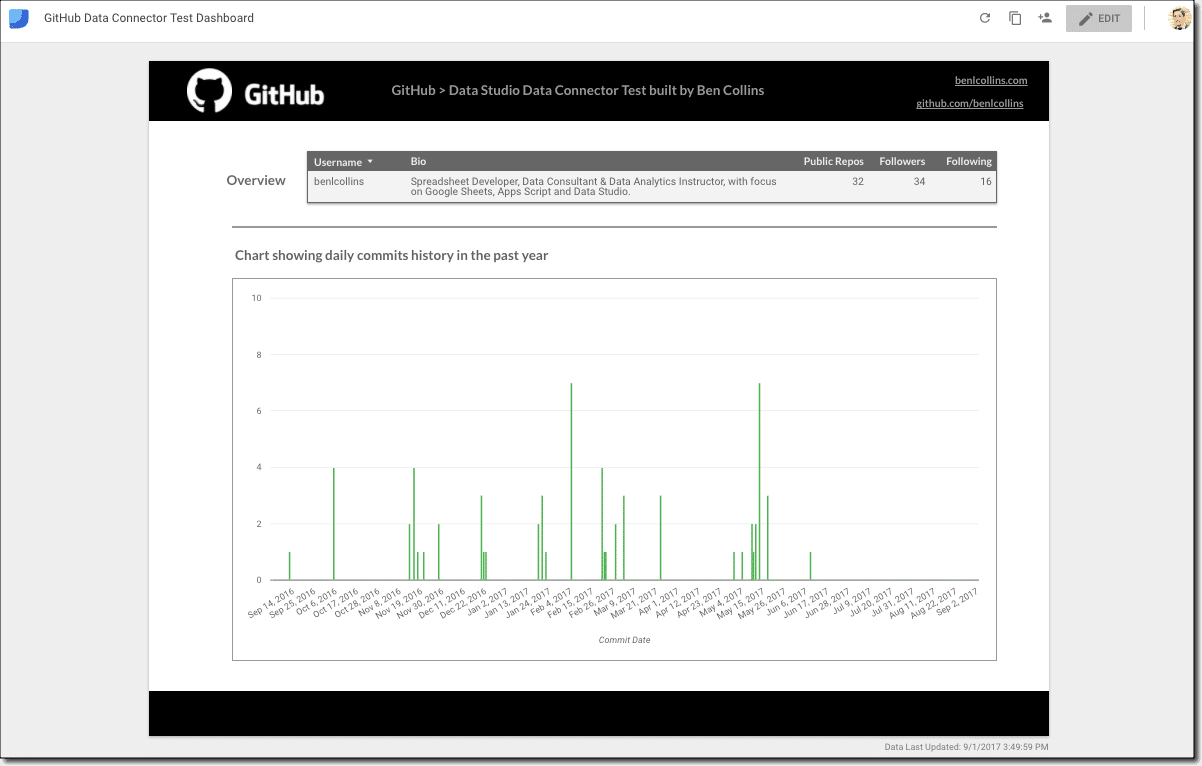
For the GitHub dashboard, I wanted basic user data from one user endpoint and then my commit history from a different events endpoint.
So I did two UrlFetchApp calls, and added both packets of data to my data schema to return to Data Studio.
Once I had that setup I created a dashboard showing an overview of my account and the last year of my commit history:
I’ll tidy up the code for this example and post it to GitHub soon.
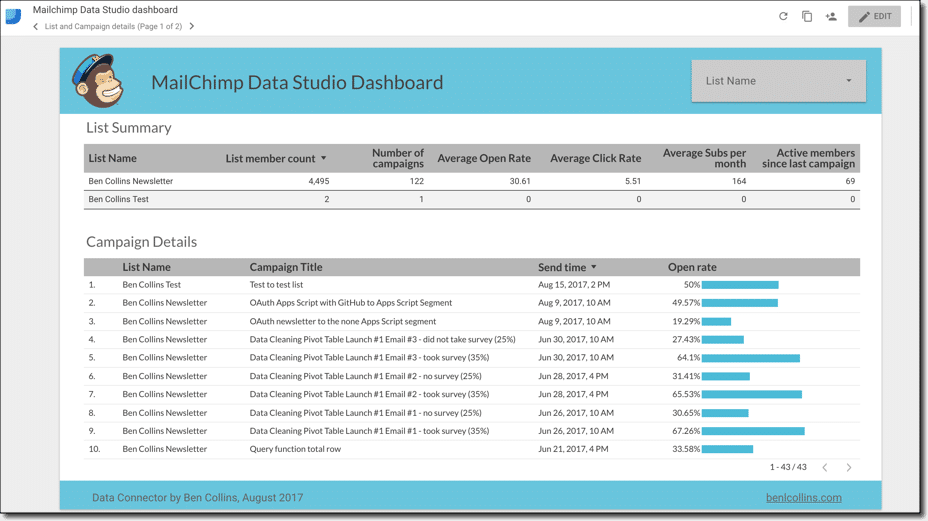
Community Connector example 3: Authenticated Mailchimp connector
Once you’ve created one authenticated data connector, you can reuse the same skeleton and workflow for your next one. Obviously the schema, API endpoints etc. will be different but the concepts are the same.
This is another authenticated data connector, which connects to MailChimp’s API so you can retrieve and visualize your MailChimp data, such as campaign performance, list growth and recent activity (amongst others).
Here’s the first page of a draft dashboard, summarizing email lists and campaigns:
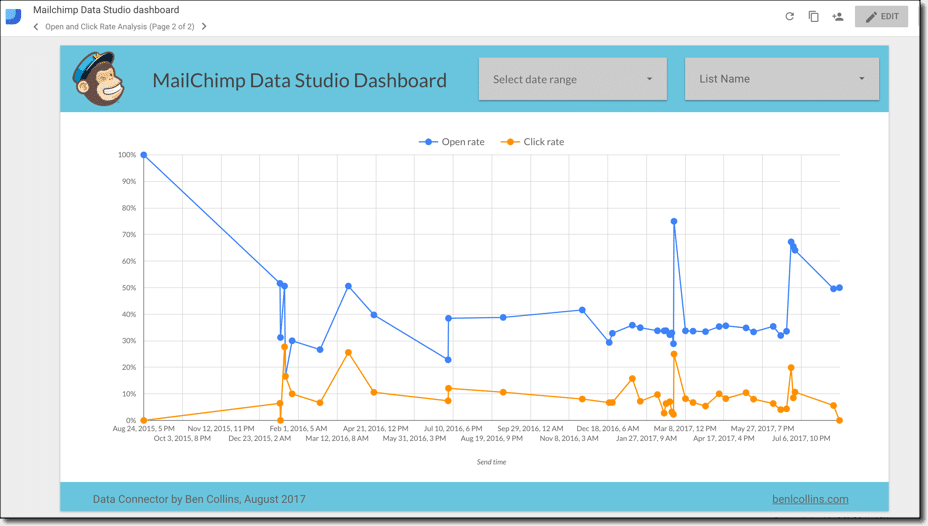
And the second page, showing campaign performance:
Thanks for this resource Ben. It must have been killing you to be sitting on this and not say anything! I’ll have to add whole new sections in my resource finder for community connectors… Great job!
Thanks Lee, appreciate it!
Loving the space-age font and visuals in your ISS location plotter!
Thanks Steve
Great, great, Ben. This is big news. Thanks a lot for sharing insights into building a connector. And I agree to Lee above: It must have been hard to never tell a word. 🙂
I’m curious to see on what price level the supermetrics stuff will be after trial expires. Let’s wait for that.
Thanks Maik 🙂
How did you use the Loggers throughout testing? When I try to run one of the functions, the code doesn’t work because the response variable hasn’t been initialized. I tried to go into ‘test as add-on’, but it doesn’t seem to work for testing Data Studio add-ons.
Hi Ben, I’m awarding you “Best Data Studio Blog post for September 2017” for this one. Keep up the great posts!
https://helpfullee.com/best-data-studio-posts-resources-september-2017/
Thanks Lee! 🙂
Hello Ben
I have been using data studio for a while now. I have a dataset in which I have multiple columns which contains comma seperated values. I want to analyse these columns based on the condition e.g village or block level. How can I do it please help? Is it possible to develop a connector to split comma seperated values?
Thanks
Nidhi
Hi there,
Thank you so much for writing this. It is very helpful. A small issue I am facing is the unavailability of ‘View > Show manifest file’ and ‘Publish > Manage Deployments’ options in my development window. Has the development window been changed or if there is anything I am missing. Please help.
Thanks
Hi Sohaib,
You need to request developer access first to see those options. Check the Prerequisites notes on this page: https://developers.google.com/datastudio/connector/get-started
Hope that helps!
Ben
Oh thanks a lot 🙂
Hi Ben,
Great article and I used your tips to setup a Connector to one of our vendor APIs. However, it seems DataStudio is setting sampleExtraction to true for requests, which means we can’t access the full API dataset. Do you know why it does this and how to change it?
Hello Ben
Thank you for this.
Just the link to your repository is wrong 😉
It must be https://github.com/benlcollins/community_connectors/tree/master/iss_viz
I would add, in final all datas comes from any api must be converted in CSV like. If it’s a list, each row values must be an array.
We published an update on our GDS connector-building journey circa fall 2019. A lot has changed since you described this including the community reference API.
https://www.newpathconsulting.com/2019/09/building-google-data-studio-partner-connector.html
Hi everyone,
I want just to know how to buid a new Facebook connector for Data Studio please.
Thanks,
The issue why in the first try the connector does not work is because the name of the schema, when declared, should be “issSchema” an not “fixedSchema”.
Thanks a lot for the guide.
Are your Authenticated GitHub & Authenticated MailChimp connectors available yet on GitHub?
Thanks!
/**
Help me, I’m not identifying the cause of why you’re not loading the data.
/
var cc = DataStudioApp.createCommunityConnector();
//var url = [“https://busao.herokuapp.com/buses”];
//var url = [“https://api.mocki.io/v1/13f44462”];
//var url = [‘https://jsonplaceholder.typicode.com/todos’];
var url = [‘https://api.mocki.io/v1/b043df5a’];
function getAuthType() {
Logger.log(“iniciado get getAuthType”);
var AuthTypes = cc.AuthType;
return cc
.newAuthTypeResponse()
.setAuthType(AuthTypes.NONE)
.build();
}
function getConfig(request){
var config = cc.getConfig();
Logger.log(“iniciado getConfig”);
// Inputs responssáveis por capturar as informações do usuário
config.newInfo().setId(“instructions”).setText(“Configurações para o mongo.”);
config
.newTextInput()
.setId(‘uriMongo’)
.setName(‘URI de conexão com o mongo’)
.setHelpText(‘URI do mongo’)
.setPlaceholder(‘URI’);
config
.newTextInput()
.setId(‘collection’)
.setName(‘Nome da collection’)
.setHelpText(‘Collection’)
.setPlaceholder(‘PRD – Collection’);
config
.newTextInput()
.setId(‘qtyOfRegistrationsForSchema’)
.setName(‘Qrde de registros para identificar o sherma’)
.setHelpText(‘Número de registros’)
.setPlaceholder(‘100’);
var option1 = config.newOptionBuilder()
.setLabel(“option label”)
.setValue(“option_value”);
var option2 = config.newOptionBuilder()
.setLabel(“second option label”)
.setValue(“option_value_2”);
config
.newSelectSingle()
.setId(‘exampleSelectMultiple’)
.setName(‘Selecione a query’)
.setHelpText(‘Helper test for select multiple’)
//.setAllowOverride(true)
.addOption(option1)
.addOption(option2)
Logger.log(“finalizado getConfig”);
return config.build();
}
function getFields() {
Logger.log(‘inicio getField()’);
// var cc = DataStudioApp.createCommunityConnector();
var fields = cc.getFields();
var types = cc.FieldType;
var aggregations = cc.AggregationType;
//================================================================
// Fazer chamada para receber os campos
//================================================================
var response = UrlFetchApp.fetch(url);
var data = JSON.parse(response.getContentText());
if (!data.length) {
return [];
}
//================================================================
//================================================================
// Varrer a lista e criar os campos necessário
//================================================================
var headers = Object.keys(data[0]);
var rows = [];
for (var i=0; i<headers.length; i++) {
rows.push(headers[i]); // Apenas Debug
fields
.newDimension()
.setId(headers[i])
.setName(headers[i])
.setType(types.TEXT);
}
//================================================================
Logger.log(rows);
Logger.log('Fim getField()');
return fields;
}
function getSchema(request){
Logger.log('inicio getScherma()');
return {schema: getFields().build()};
}
function getData(request){
Logger.log('inicio getData()');
var response = UrlFetchApp.fetch(url);
var parseResponse = JSON.parse(response);
// Toda a chave da requisição
var headers = Object.keys(parseResponse[0]);
// Prepare the schema for the fields requested.
var data = [] ;
var dataSchema = [];
for (var i = 0; i < headers.length; i++) {
dataSchema.push('{' + headers[i] + '}');
};
// var rows = [];
for (var i=0; i<parseResponse.length; i++) {
var row = [];
for (var j=0; j<headers.length; j++) {
row.push("\"" + parseResponse[i][headers[j]] + "\"");
}
data.push("{[" + row + "]}");
}
Logger.log(dataSchema);
Logger.log(data);
return {
schema : dataSchema,
rows : data
};
}